Deploy Smart Contract On Any EVM Chain using thirdweb
“Exploring the Deployment of Smart Contracts on Various EVM Chains with thirdweb”

Hello, I hope you are doing well!
Thanks for your interest in reading about me.
👨💻 Im a skilled Software Engineer specializing in Full Stack Web3 (Blockchain) applications and Frontend Web Applications. Currently, I am pursuing a Master's in Web Engineering at Technische Universität Chemnitz, Saxony, Germany.
🚀 I have been coding since 2017. I loved building Full Stack Web3 applications, securing them from vulnerabilities, and learning new threats related to smart contracts.
❤️ I have also helped thousands of people in open-source communities to learn, build, and secure blockchain applications.
Before diving into the blockchain field, I had worked as a Full Stack Flutter developer in a firm in Pakistan for almost 1 year after graduation. There I worked on many enterprise-level applications and developed them using Flutter & Dart for Mobile, and Web.
In addition to that, in these 7 years of my software development period, I learned many tools, languages, frameworks, and libraries including Java, Python, JavaScript, TypeScript, Dart, Solidity, React, Next.js, Flutter, Git, Node.js, Express.js and many others and built really cool products for the need and fun purpose.
I am looking forward to excelling in the web2 web3 industries personally and helping others to achieve the same level.
Thanks 🙏
Blockchain technology has opened up a new world of possibilities for developers to create decentralized applications that can revolutionize various industries. Smart contracts are an essential component of these decentralized applications as they enable developers to build trustless systems that can execute automatically without the need for intermediaries.
Ethereum Virtual Machine (EVM) is a popular blockchain platform that supports the execution of smart contracts. However, with the rise of other EVM-compatible blockchain networks like Binance Smart Chain and Polygon, developers now have more options to choose from. In this blog, we will explore how to deploy smart contracts on various EVM chains using Thirdweb.
Thirdweb is a blockchain infrastructure provider that offers a suite of tools and services for developers to easily build and deploy decentralized applications (DApps) on various blockchain networks. It provides a user-friendly interface for interacting with blockchain networks, allowing developers to create or import, and deploy smart contracts and DApps with ease. Thirdweb also offers hosting solutions, data storage, and other developer tools to make the development and deployment process smoother and more efficient.
Create a Project
Let us delve into the process of creating a smart contract from the ground up using the thirdweb framework, and subsequently deploying it to any Ethereum Virtual Machine (EVM)-compatible blockchain.
Navigate to the desired directory where you wish to initialize the project in your terminal and execute the following command:
npx thirdweb create contract
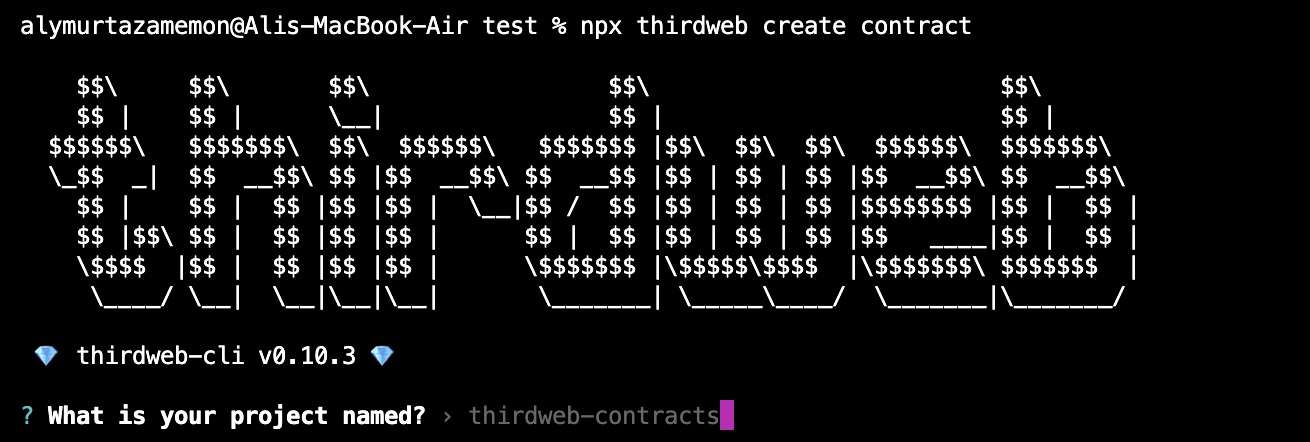
After executing the aforementioned command, a verbose message from the thirdweb framework will appear on your terminal prompt. The message will prompt you to enter a name for your project. Please enter a name of your choice. For this example, we will use thirdweb-demo.
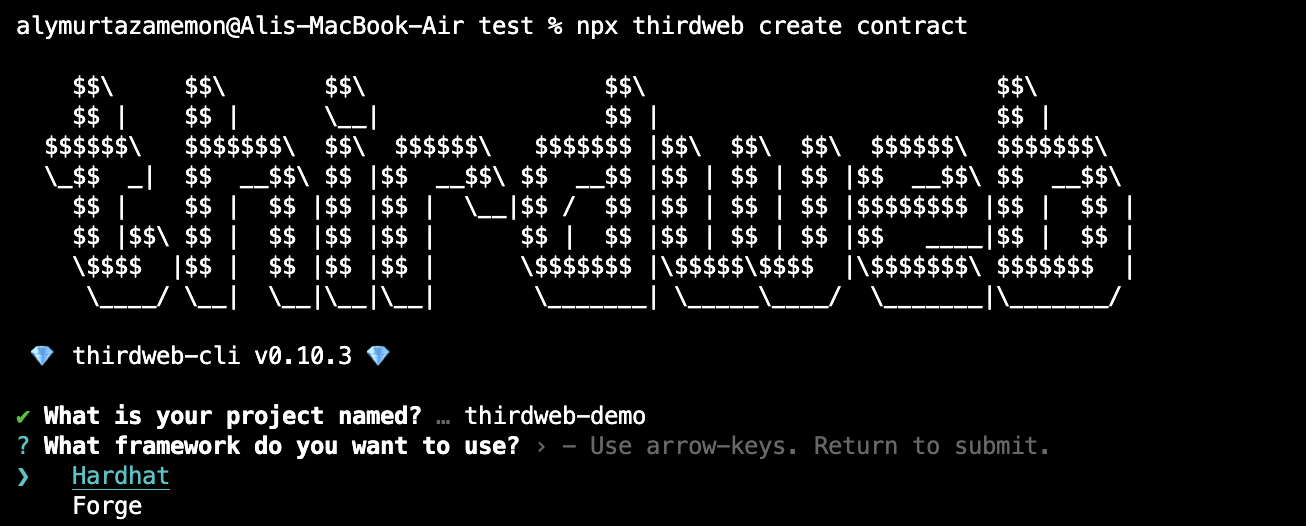
Subsequently, you will be prompted to select the framework of your choice to create your smart contract. For the purpose of this demonstration, we will be selecting Hardhat.
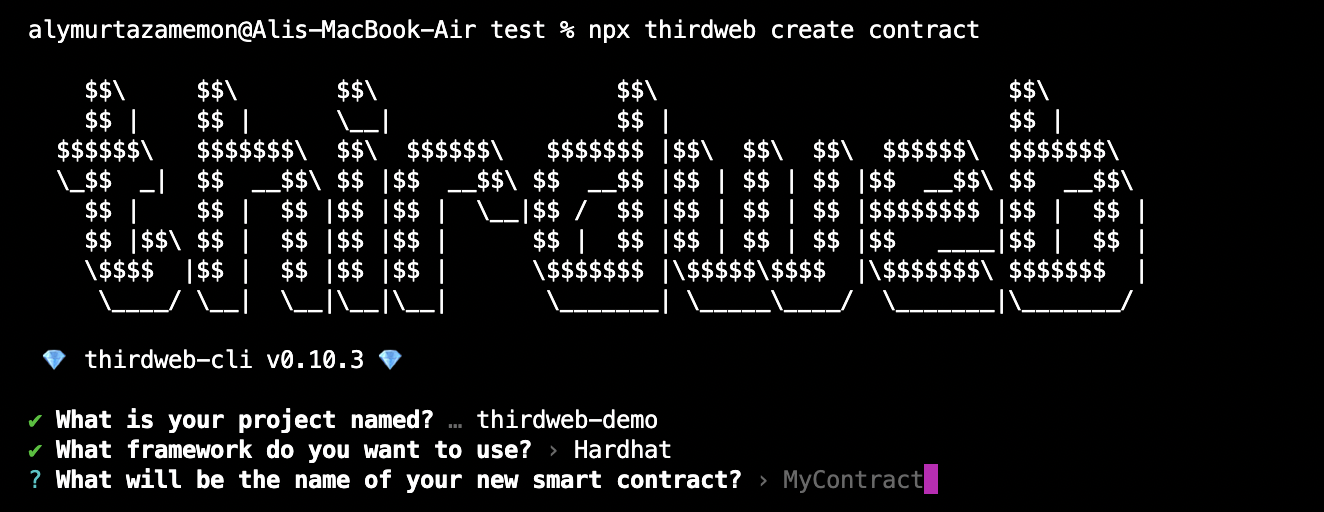
Following the selection of the framework, you will be prompted to enter the name of your smart contract. In this example, we will be utilizing the basic Box smart contract for demonstration purposes, and thus we will name it accordingly.
Improve the feature — thirdweb Team: The thirdweb team, I would like to bring to your attention that the name prompt feature does not appear to be functioning as intended. Upon execution, an empty contract labelled “MyContract” with a file name “Contract.sol” is generated, instead of using the name provided through the prompt. It would be beneficial if this feature were to be updated such that the file and contract name are derived from the user input provided through the prompt.
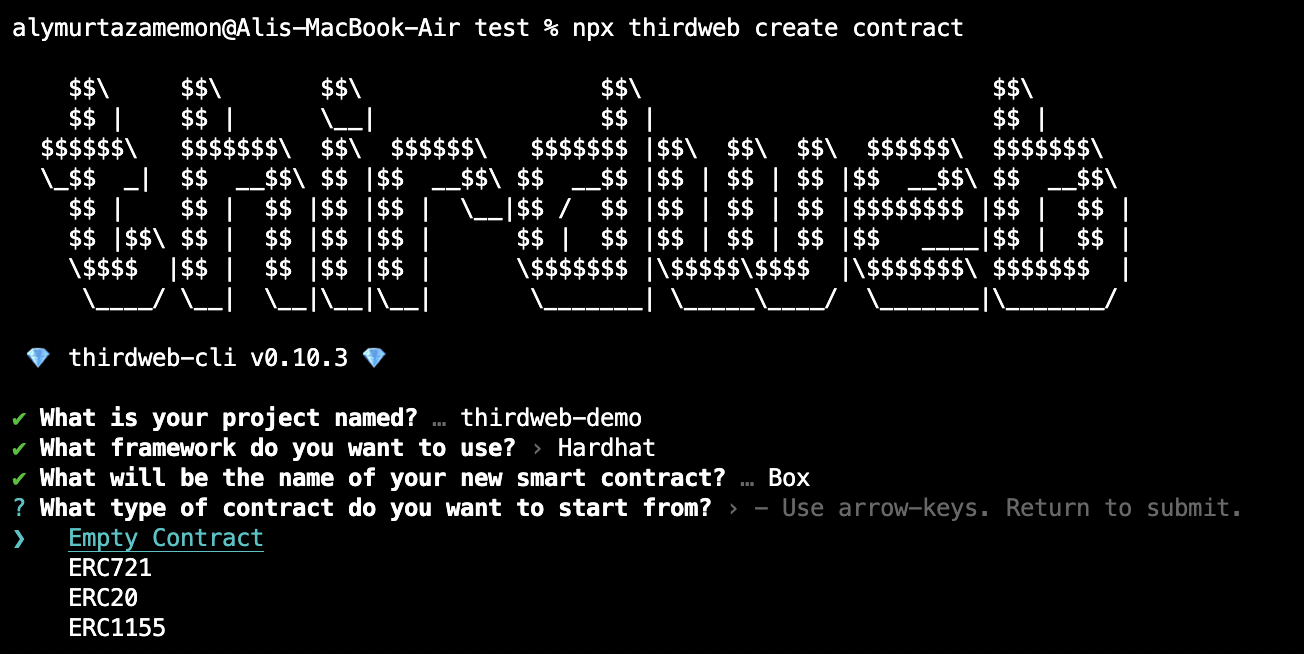
Following the previous step, you will be prompted to select the type of smart contract you wish to utilize. Several options will be presented to you, including ERC20, ERC721, and ERC1155 compatible contracts. For this demonstration, we will be selecting the “Empty Contract” option.
Upon selecting the desired smart contract type, the necessary project dependencies will be installed automatically. Once the installation process is complete, you may proceed to open the project in your preferred code editor. For the purpose of this article, we will be utilizing VSCode.
Deploy Any Smart Contract
// SPDX-License-Identifier: MIT
pragma solidity ^0.8.17;


contract Box {
    uint256 private value;

    event ValueChanged(uint256 indexed value);

    function store(uint256 _value) external {
        value = _value;
        emit ValueChanged(_value);
    }

    function retrieve() external view returns (uint256) {
        return value;
    }
}
After opening the project in your preferred code editor, please navigate to the “contracts” directory and rename the default Contract.sol file to Box.sol. Once renamed, please replace the contents of the file with the provided Box smart contract code.
Additionally, you will need to ensure that the Solidity version specified in the hardhat.config.js file is compatible with the version utilized in your smart contract(s). In this case, since the provided Box smart contract code is written in version 0.8.17, we will need to update the version specified in the hardhat.config.js file to match. For example, we would update the version from 0.8.9 to 0.8.17 to ensure compatibility.
Deploying
yarn deploy
After successfully compiling the code, the smart contract can be deployed to any blockchain utilizing the thirdweb framework. To do so, please execute the above command.
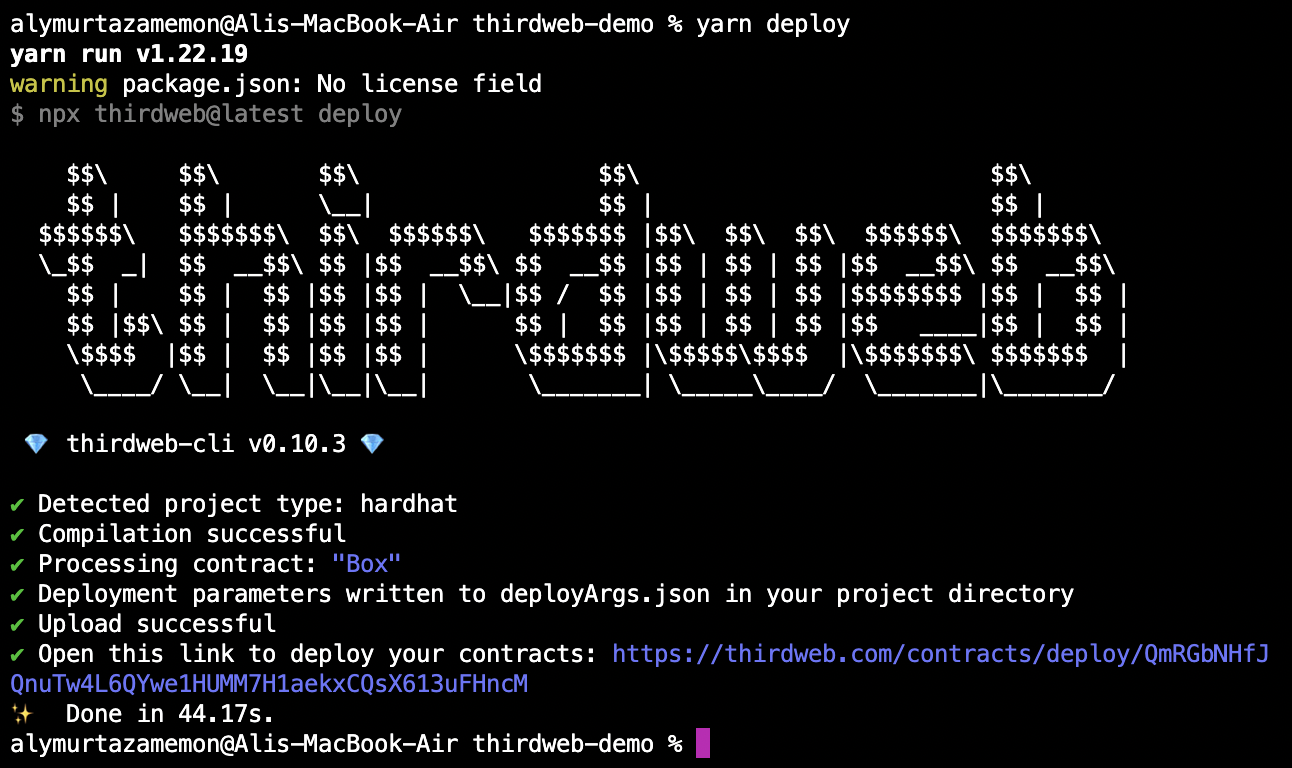
That’s it! 🥳 This command does the following:
Compiles your contract
Opens the dashboard for you to select one of the supported networks to deploy to
Please note that in the event that the dashboard does not open automatically, you may access it manually by clicking on the provided link within the terminal.
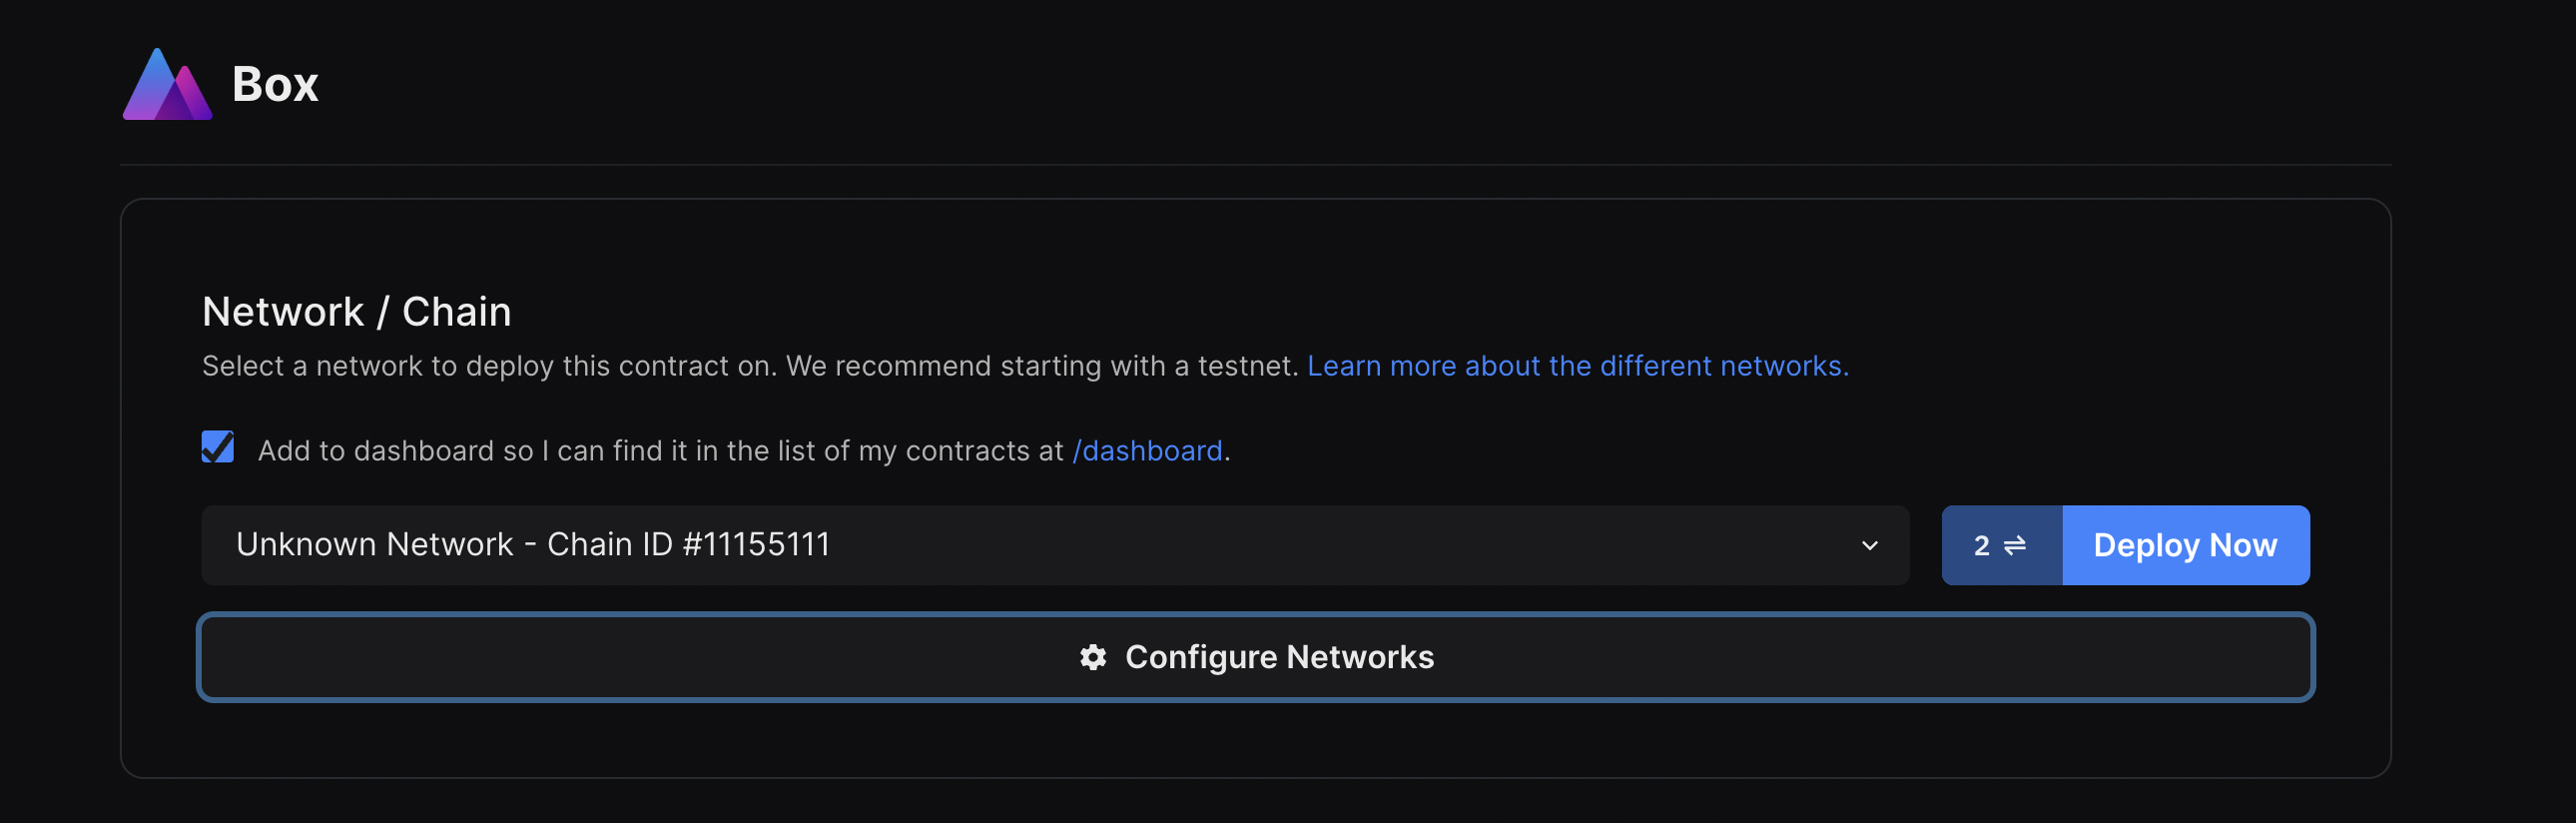
Upon accessing the dashboard, you will be presented with the details of your smart contract, as well as the network settings. By default, the network will be selected based on the network selected within your Metamask wallet. However, you may also choose to select a different network from the available options within the dropdown menu.
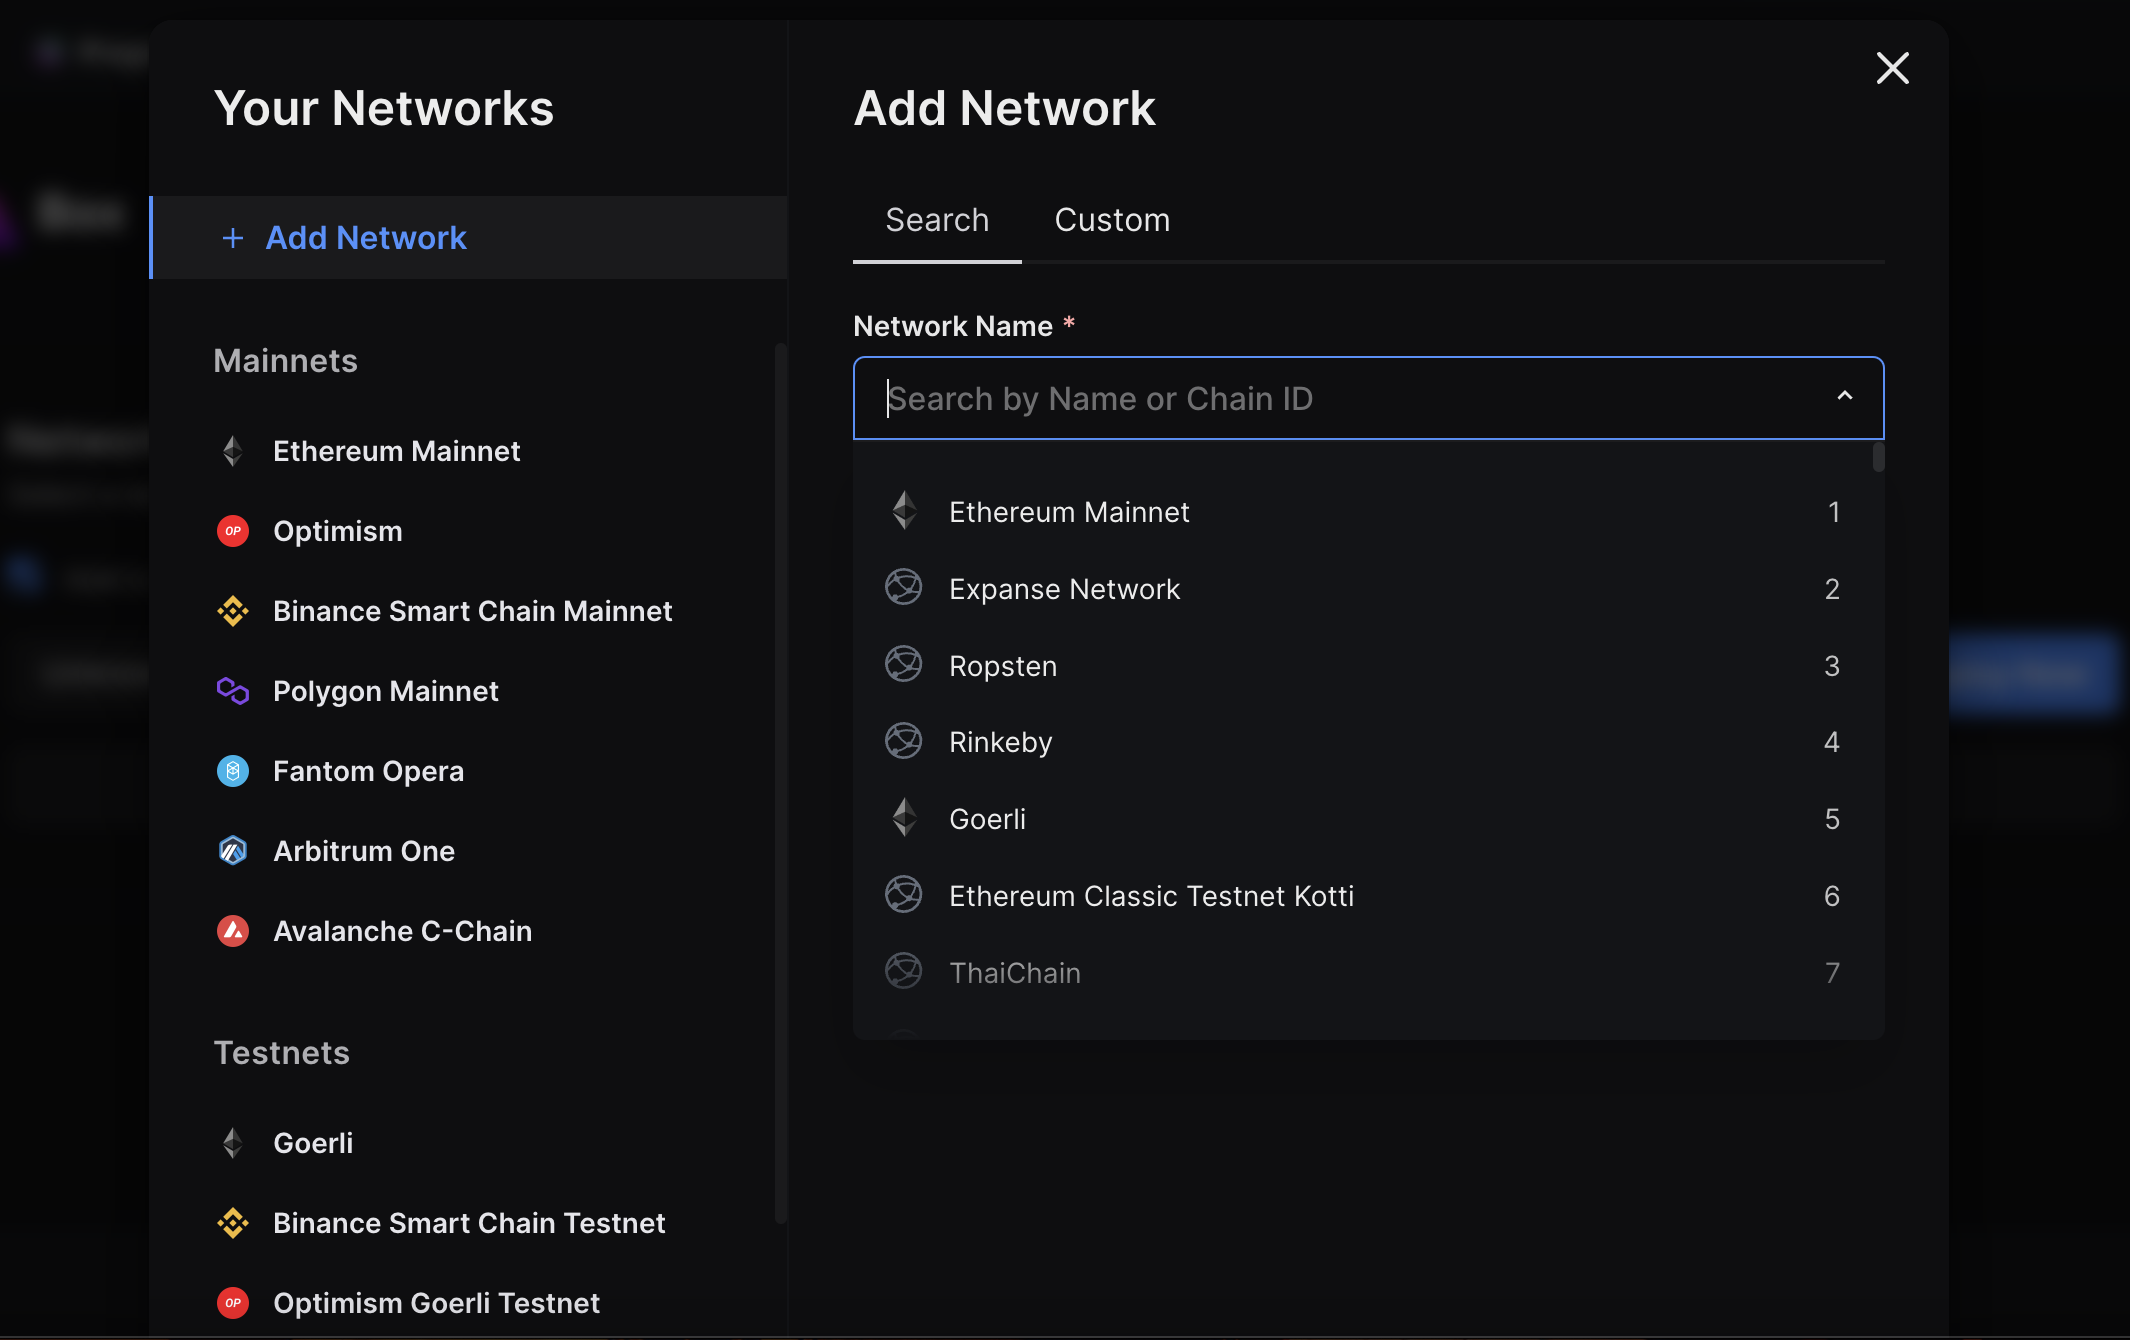
In the event that your preferred network is not available within the dropdown menu, you may select the “Configure Networks” button to access a list of available networks. From here, you may search for and add your preferred network to the list of available networks.
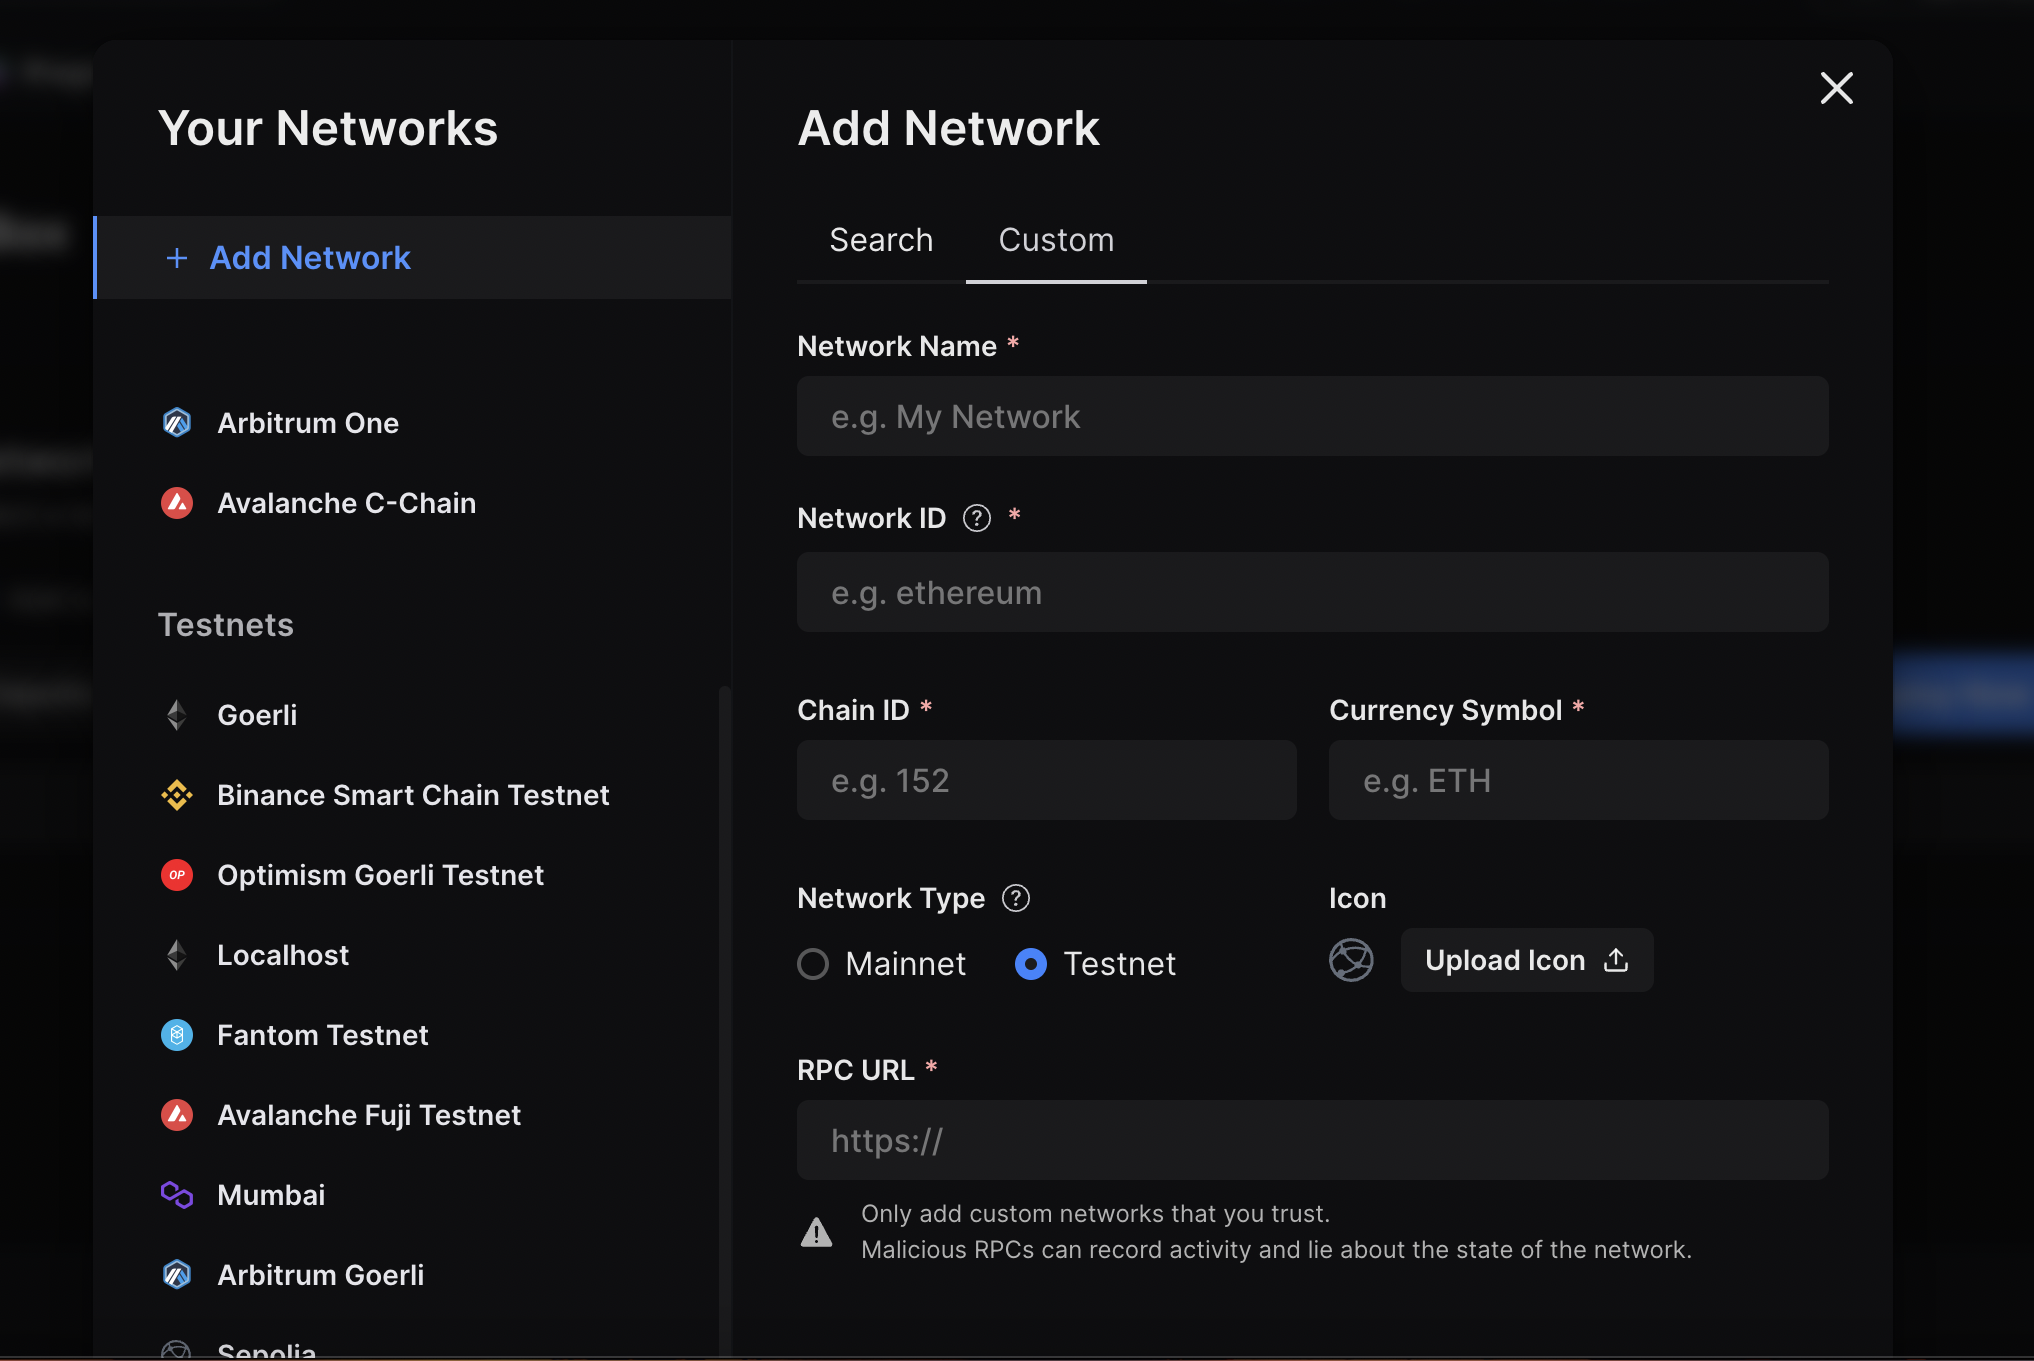
Furthermore, you also have the option to add custom networks by providing the relevant information within the “Custom Network” tab. This allows you to connect to and deploy your smart contract on any network of your choosing, regardless of whether it is listed within the preconfigured options or not.
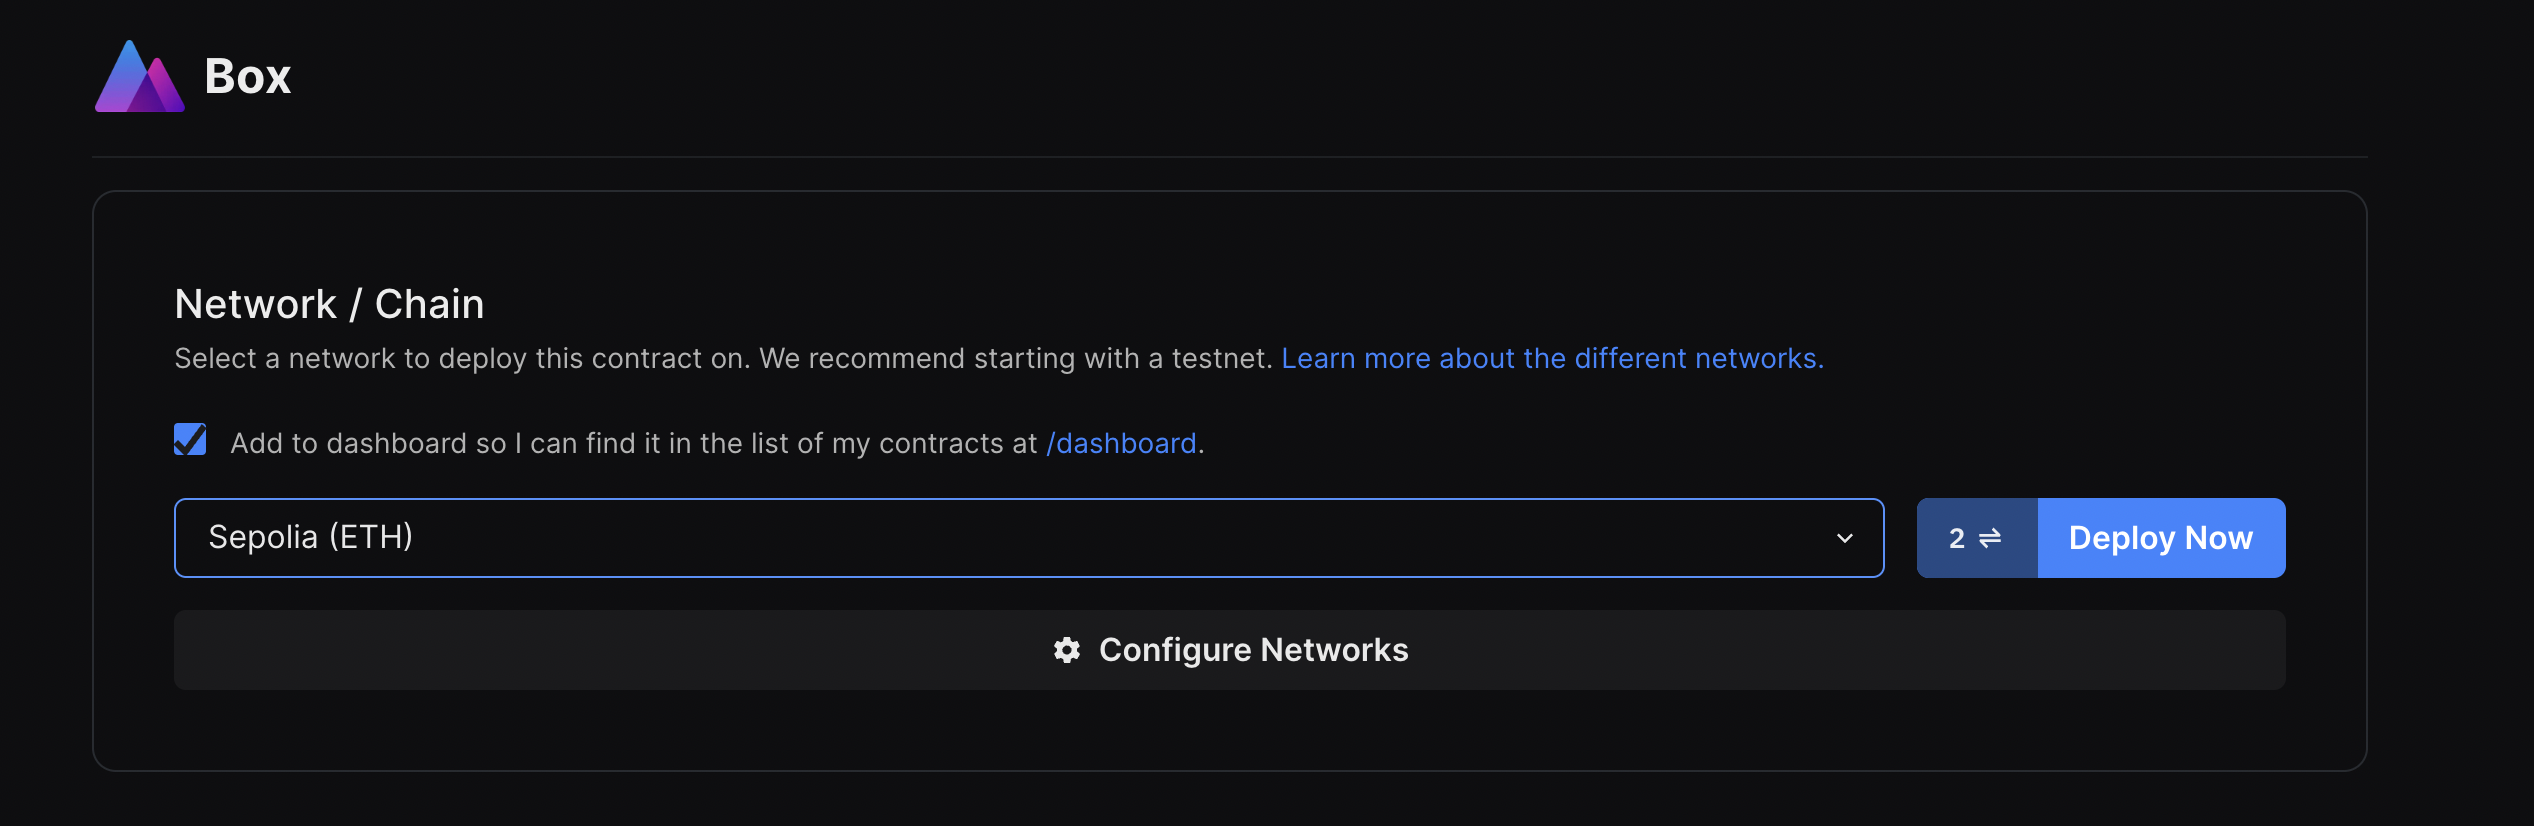
Once you have successfully configured your desired network, it will be available within the dropdown menu for selection. From here, you may select the network and proceed to deploy your smart contract on it.
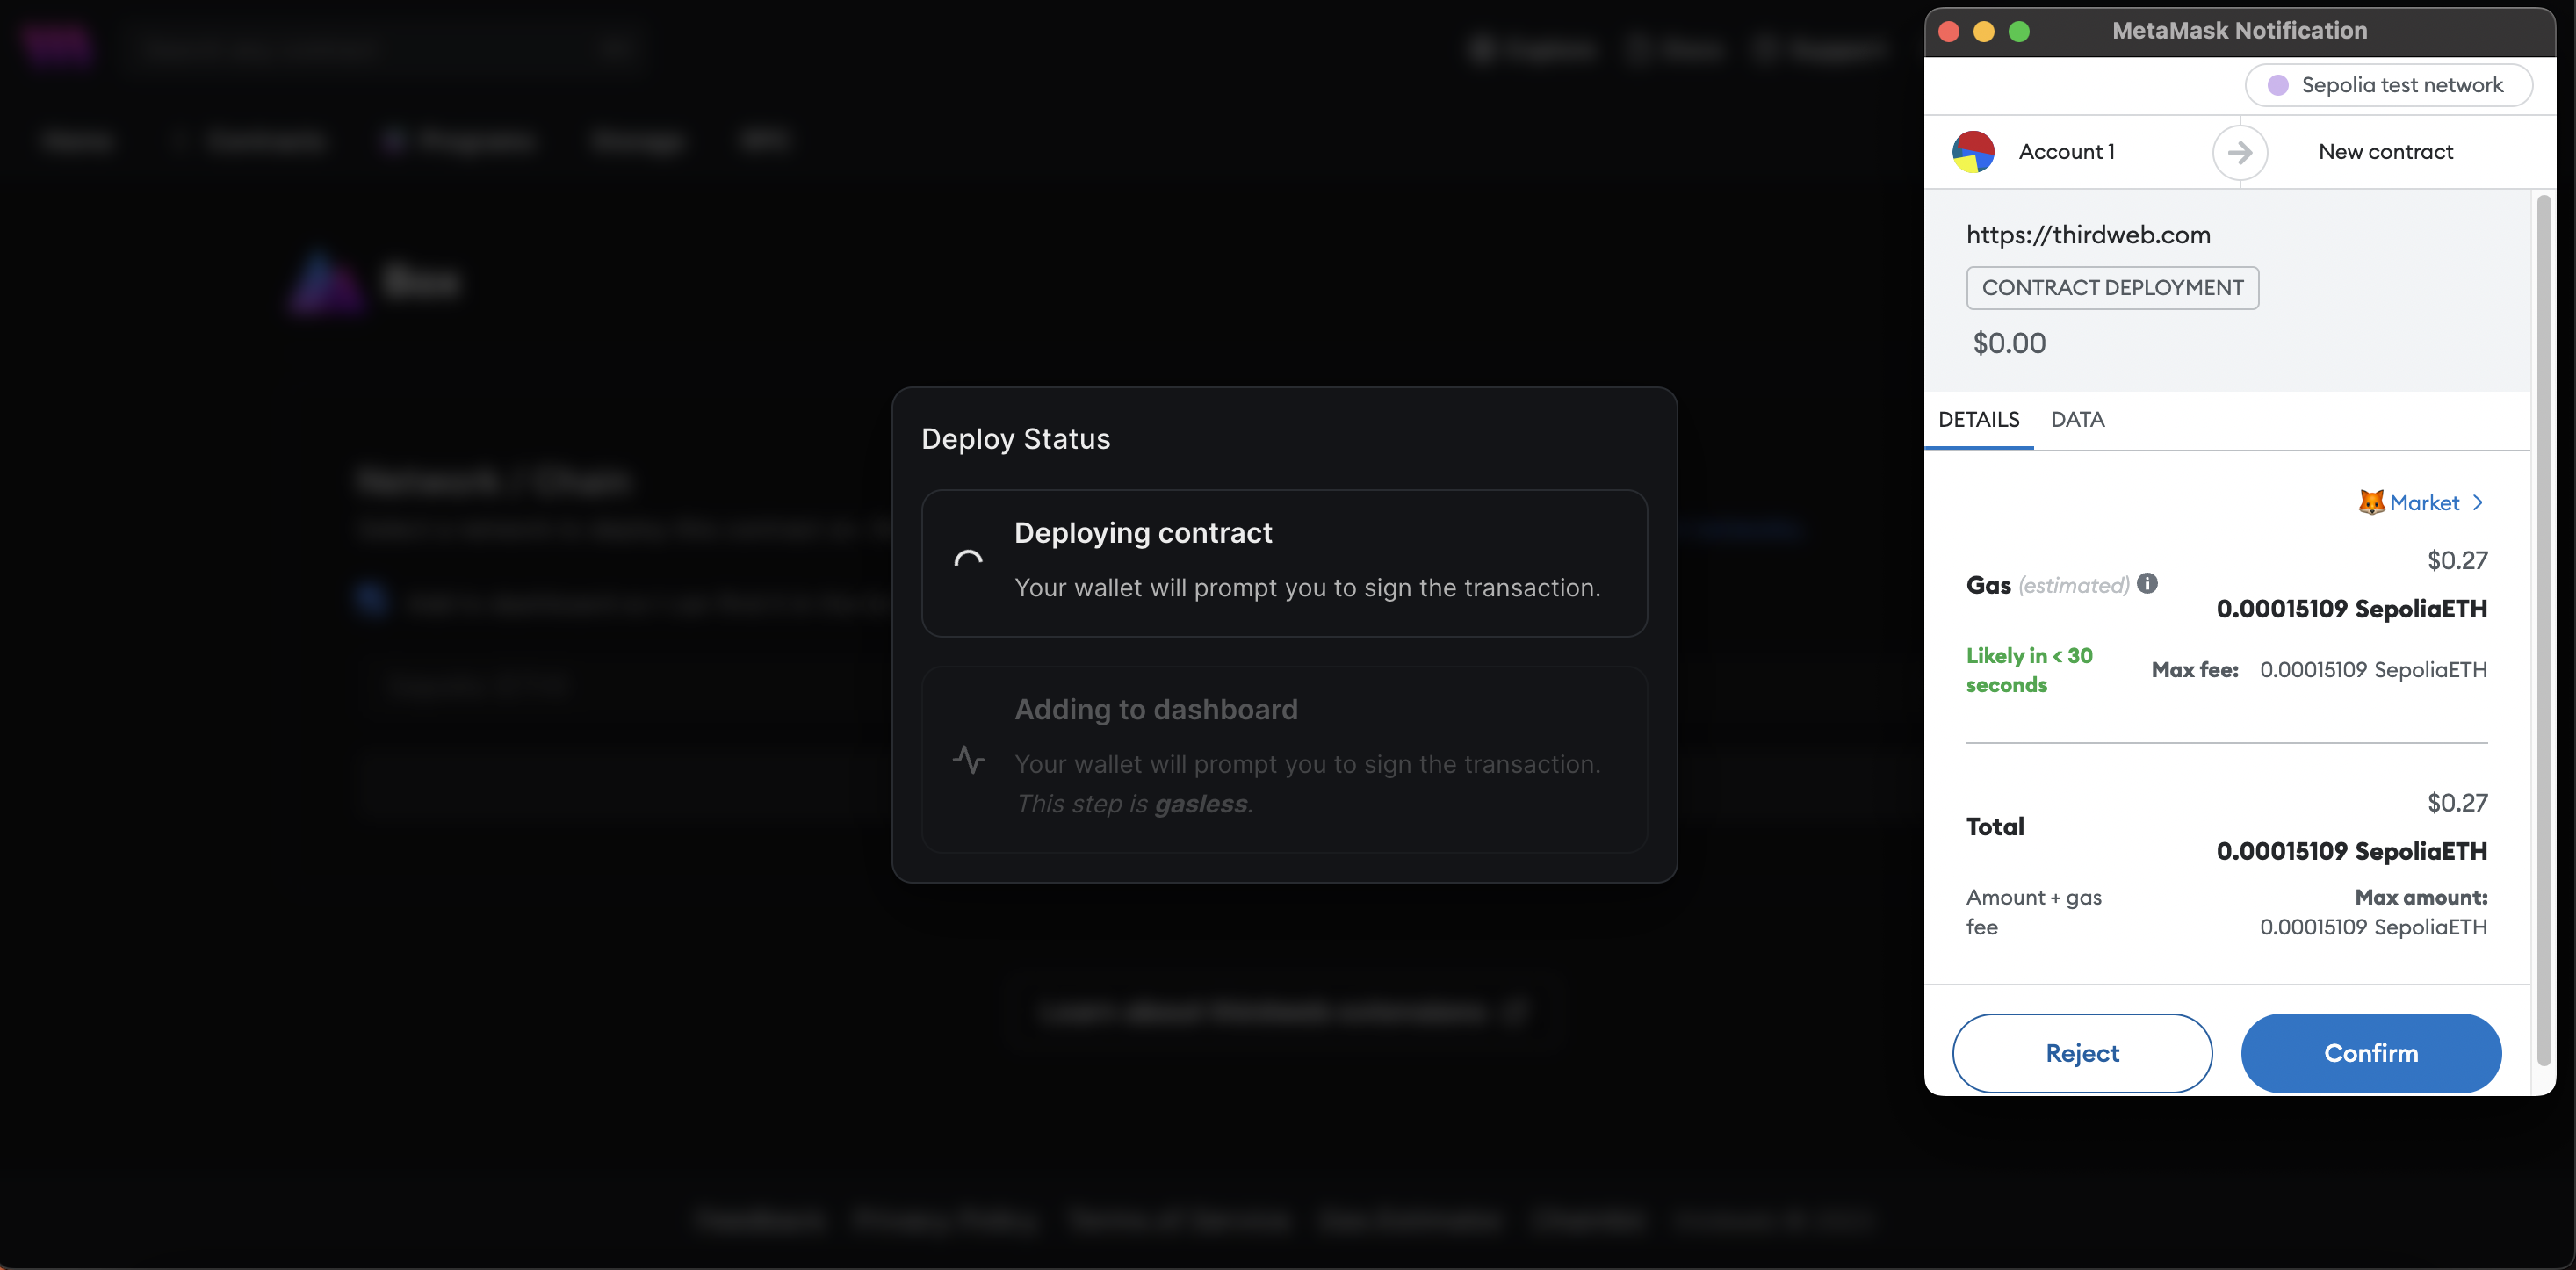
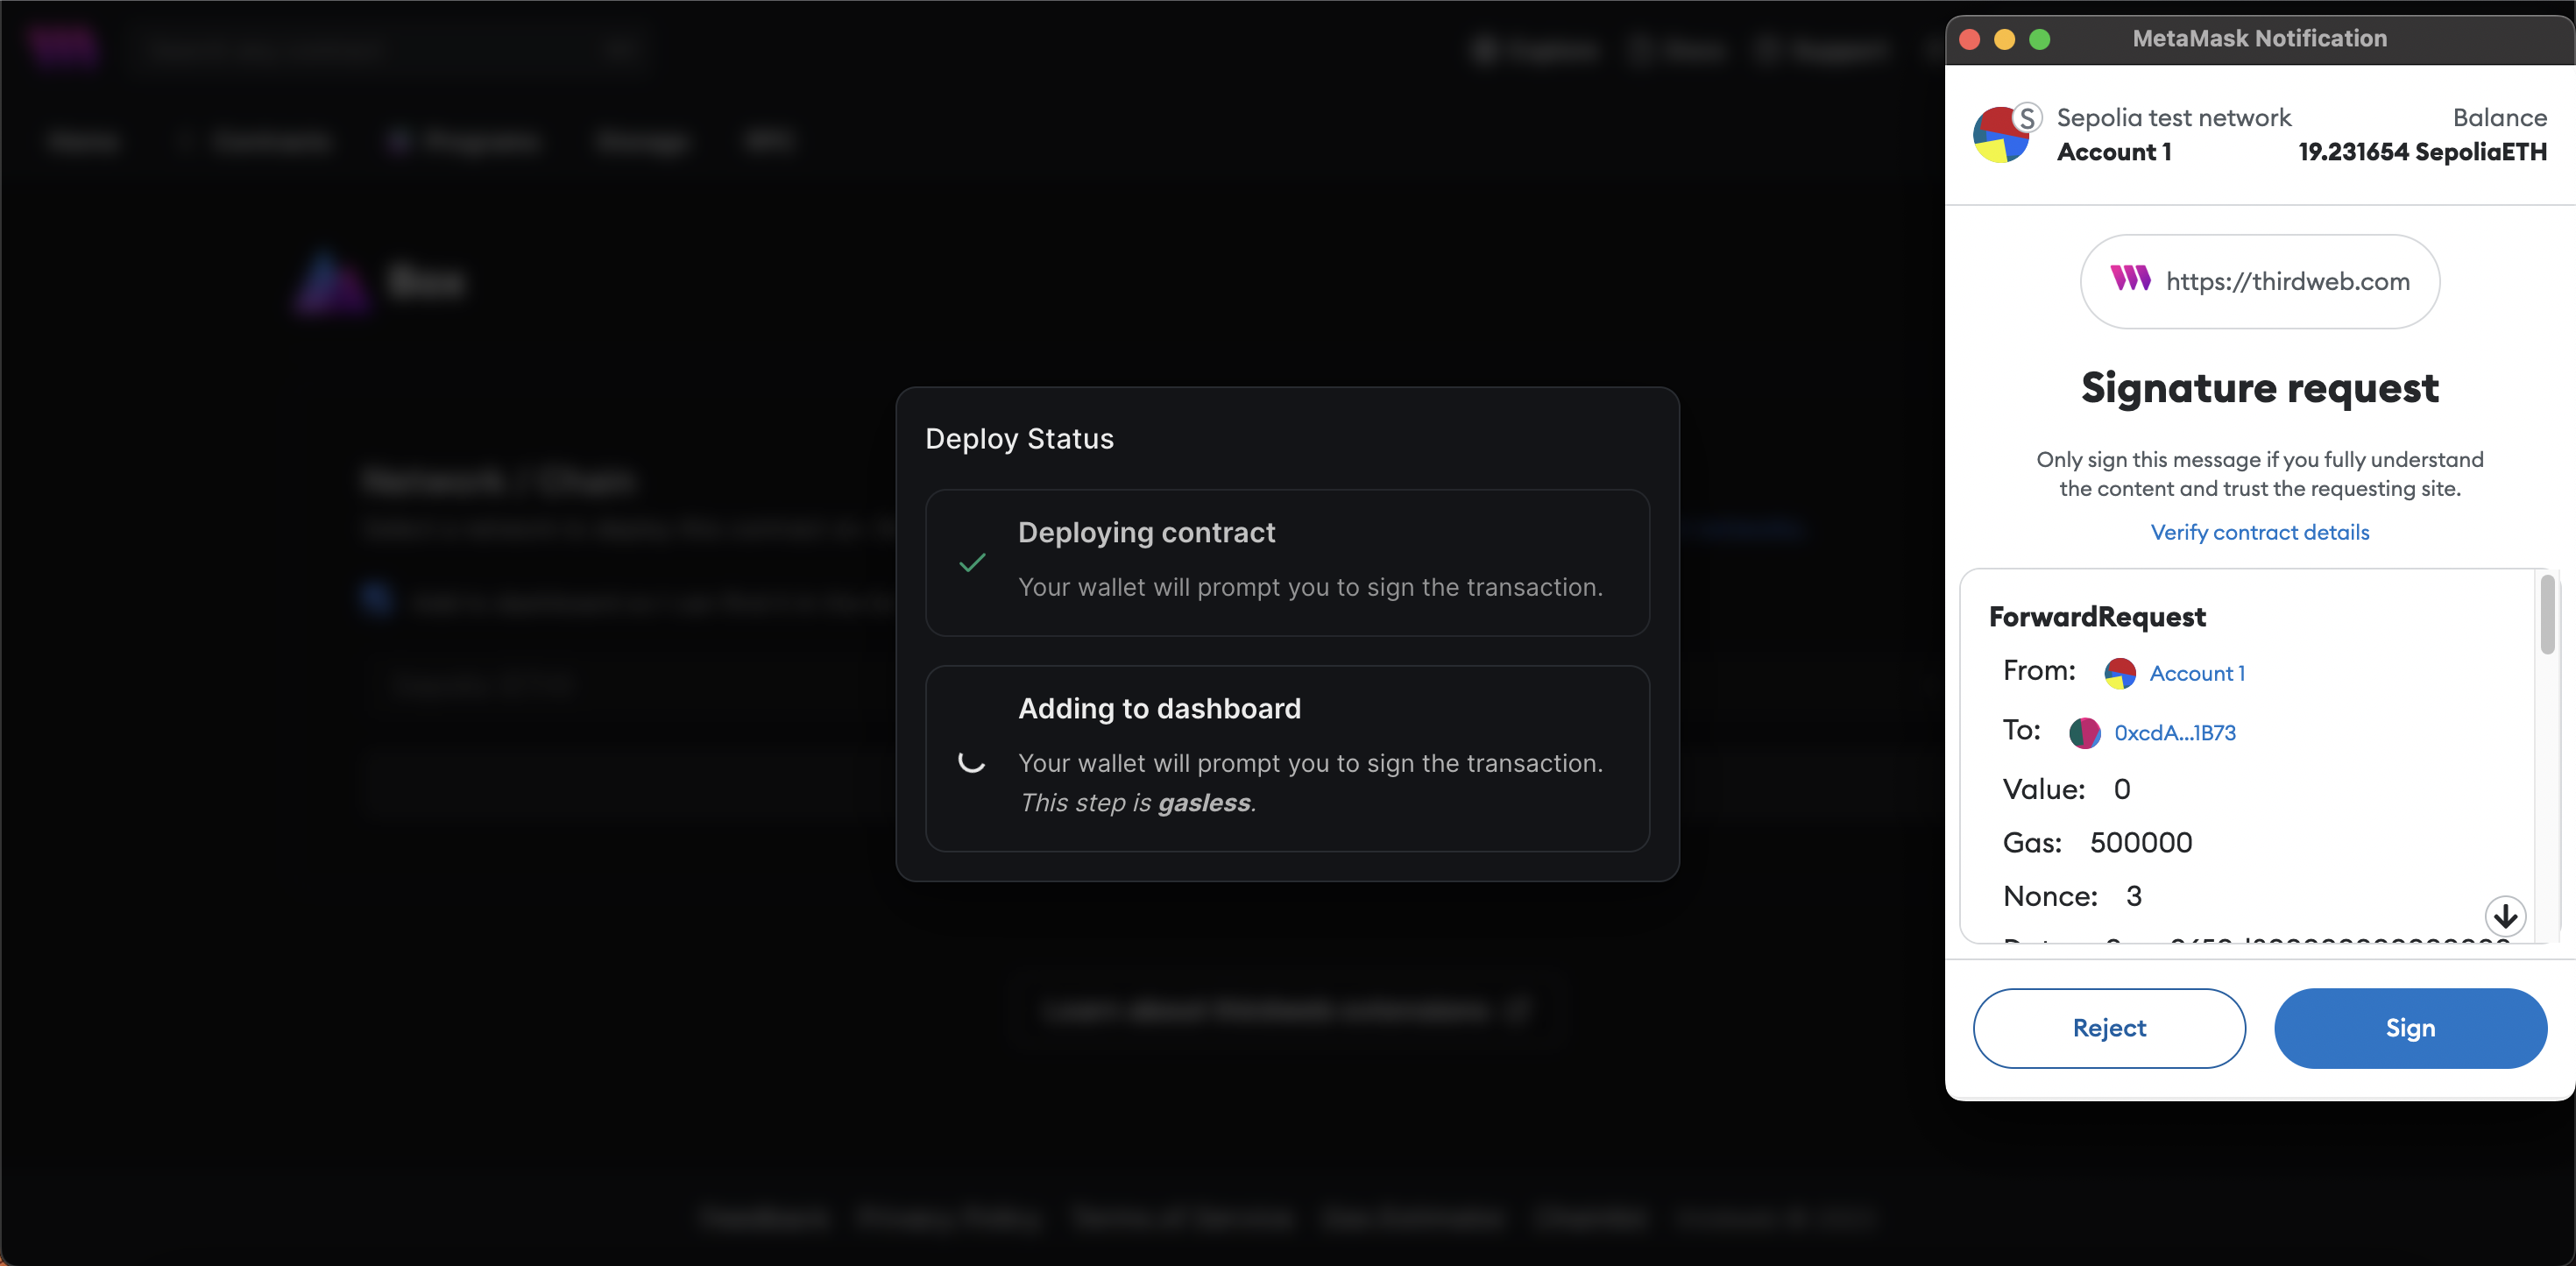
Upon selecting the “Deploy Now” button, the deployment process for your smart contract will commence. A pop-up from your Metamask wallet will appear requesting your confirmation to proceed with the deployment. Upon confirming, the smart contract will be successfully deployed and another signature request will appear, allowing you to add the deployed smart contract to the thirdweb dashboard for further interaction and management using the dashboard’s features.
Manage Your Smart Contract — thirdweb Dashboard
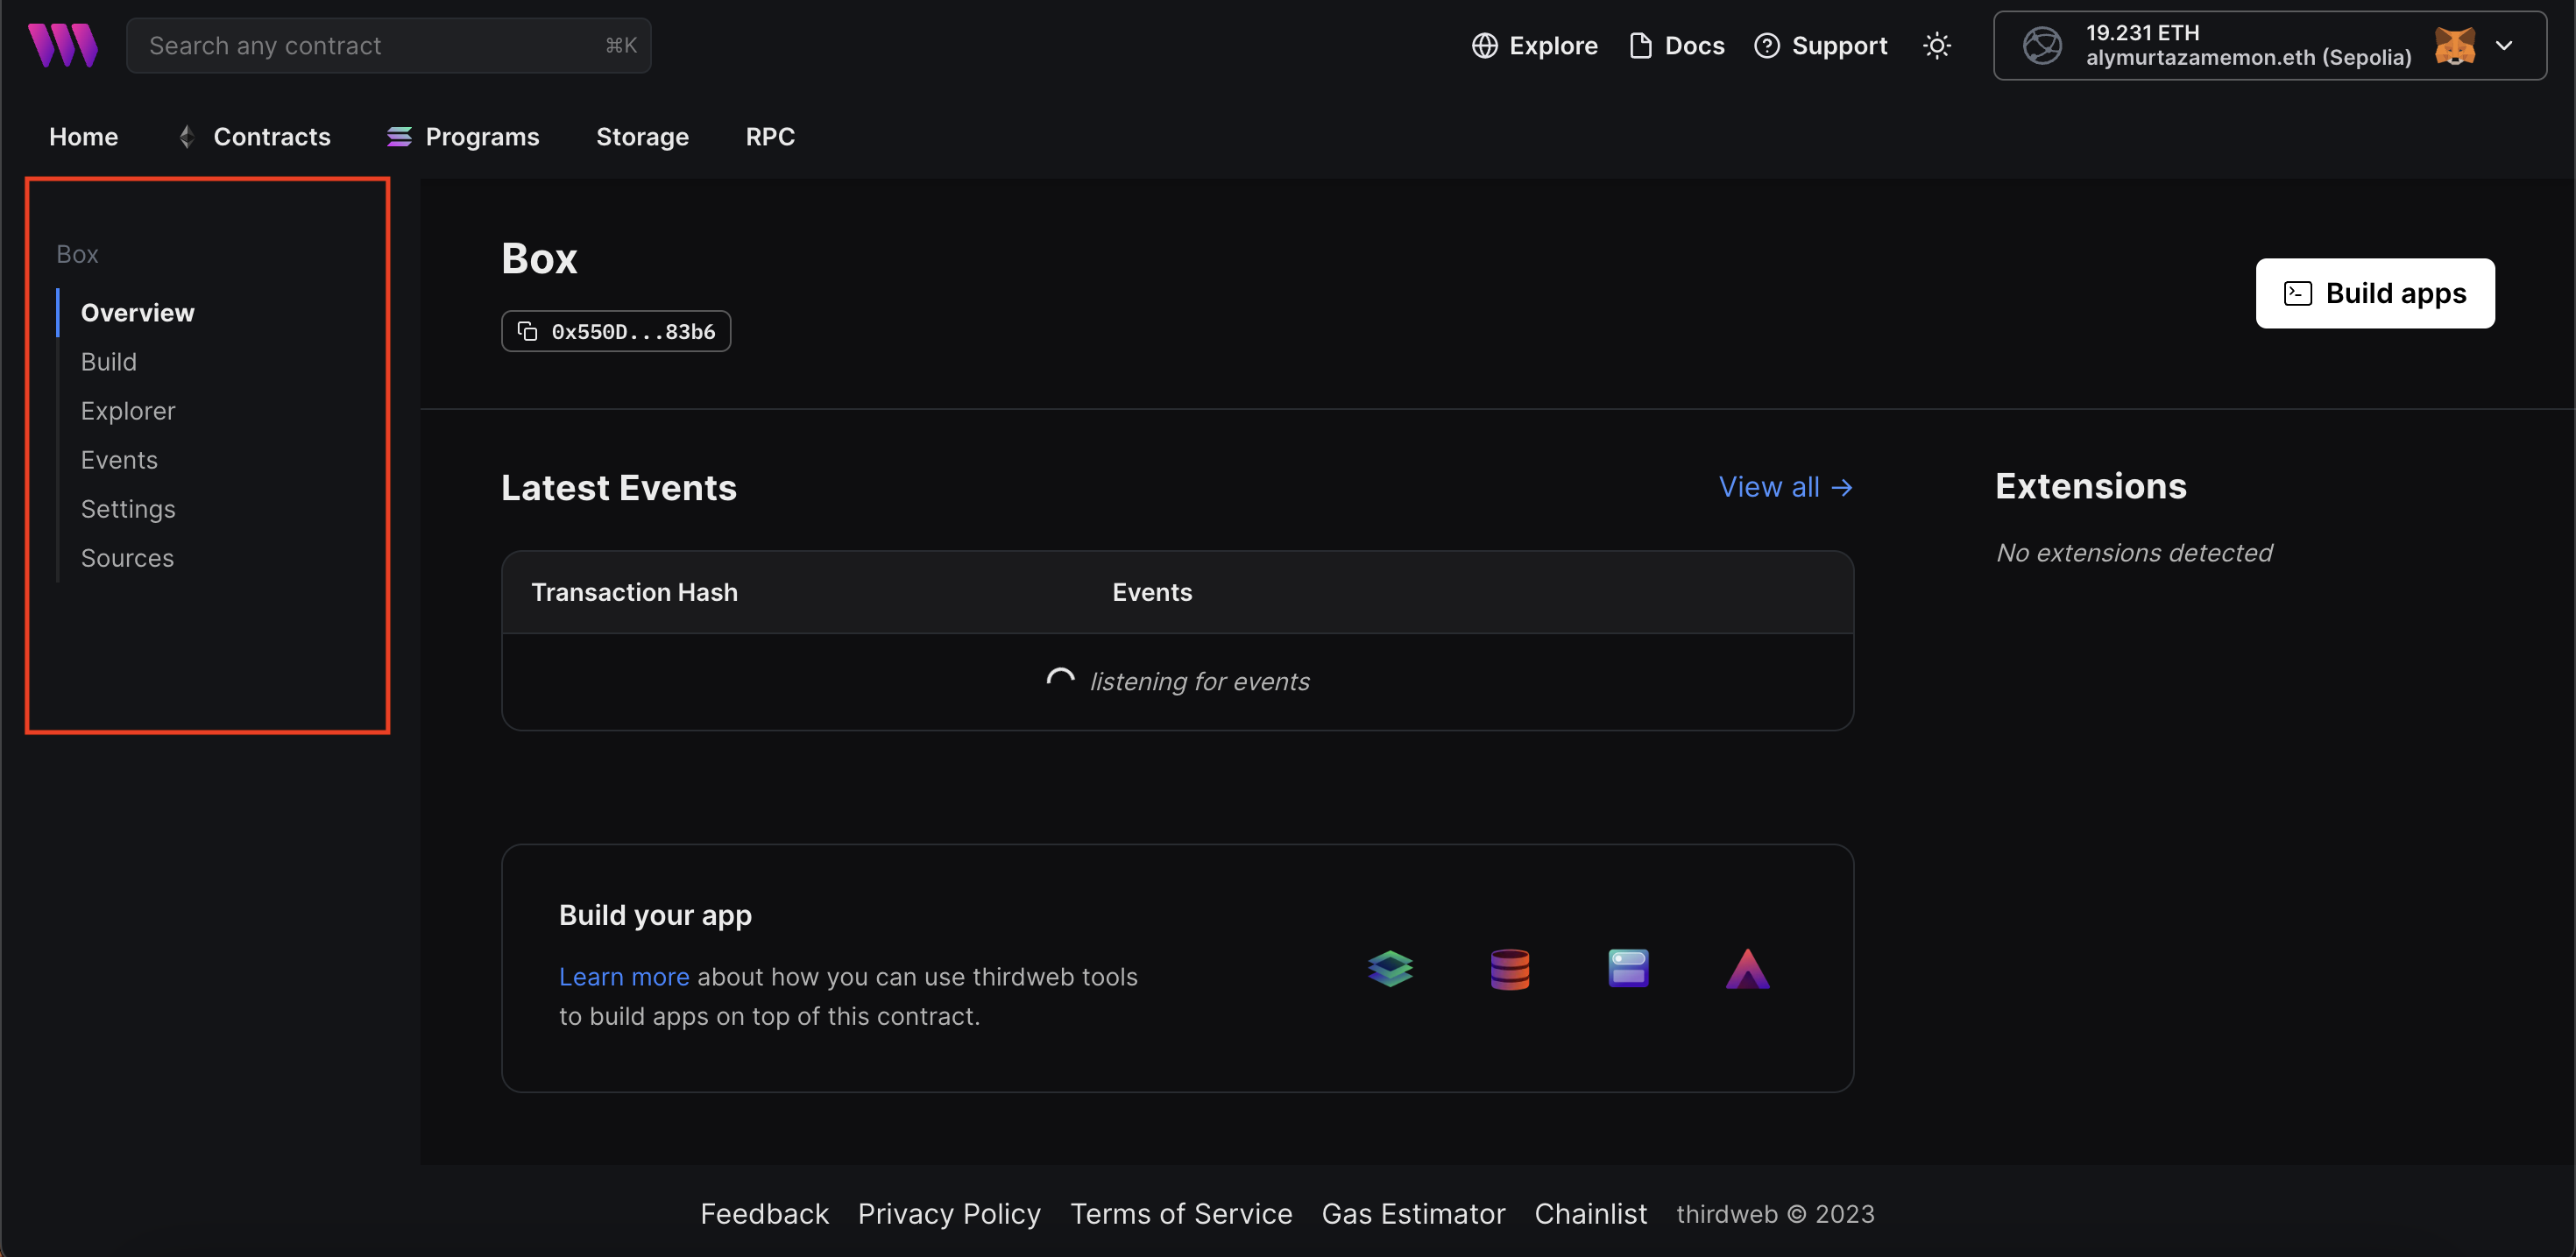
Upon successfully adding your smart contract to the thirdweb dashboard, the dashboard for your contract will be automatically opened, displaying all the relevant details and options for interacting with your smart contract through the dashboard.
Overview Tab
In the Overview tab of the contract dashboard, you can see a list of all the events emitted by your Box smart contract, along with their timestamps. This can be useful for tracking the state changes and activity of your smart contract over time. Additionally, you can view any extensions that are available for your smart contract, which can add additional functionality and features to your smart contract.
You can view the details of your Box smart contract, including its functions, events, and variables, as well as its current state and transaction history, on the contract dashboard within the thirdweb dashboard. From there, you can interact with the smart contract by calling its functions, sending transactions, and monitoring its events and state changes in real time.
Build Tab
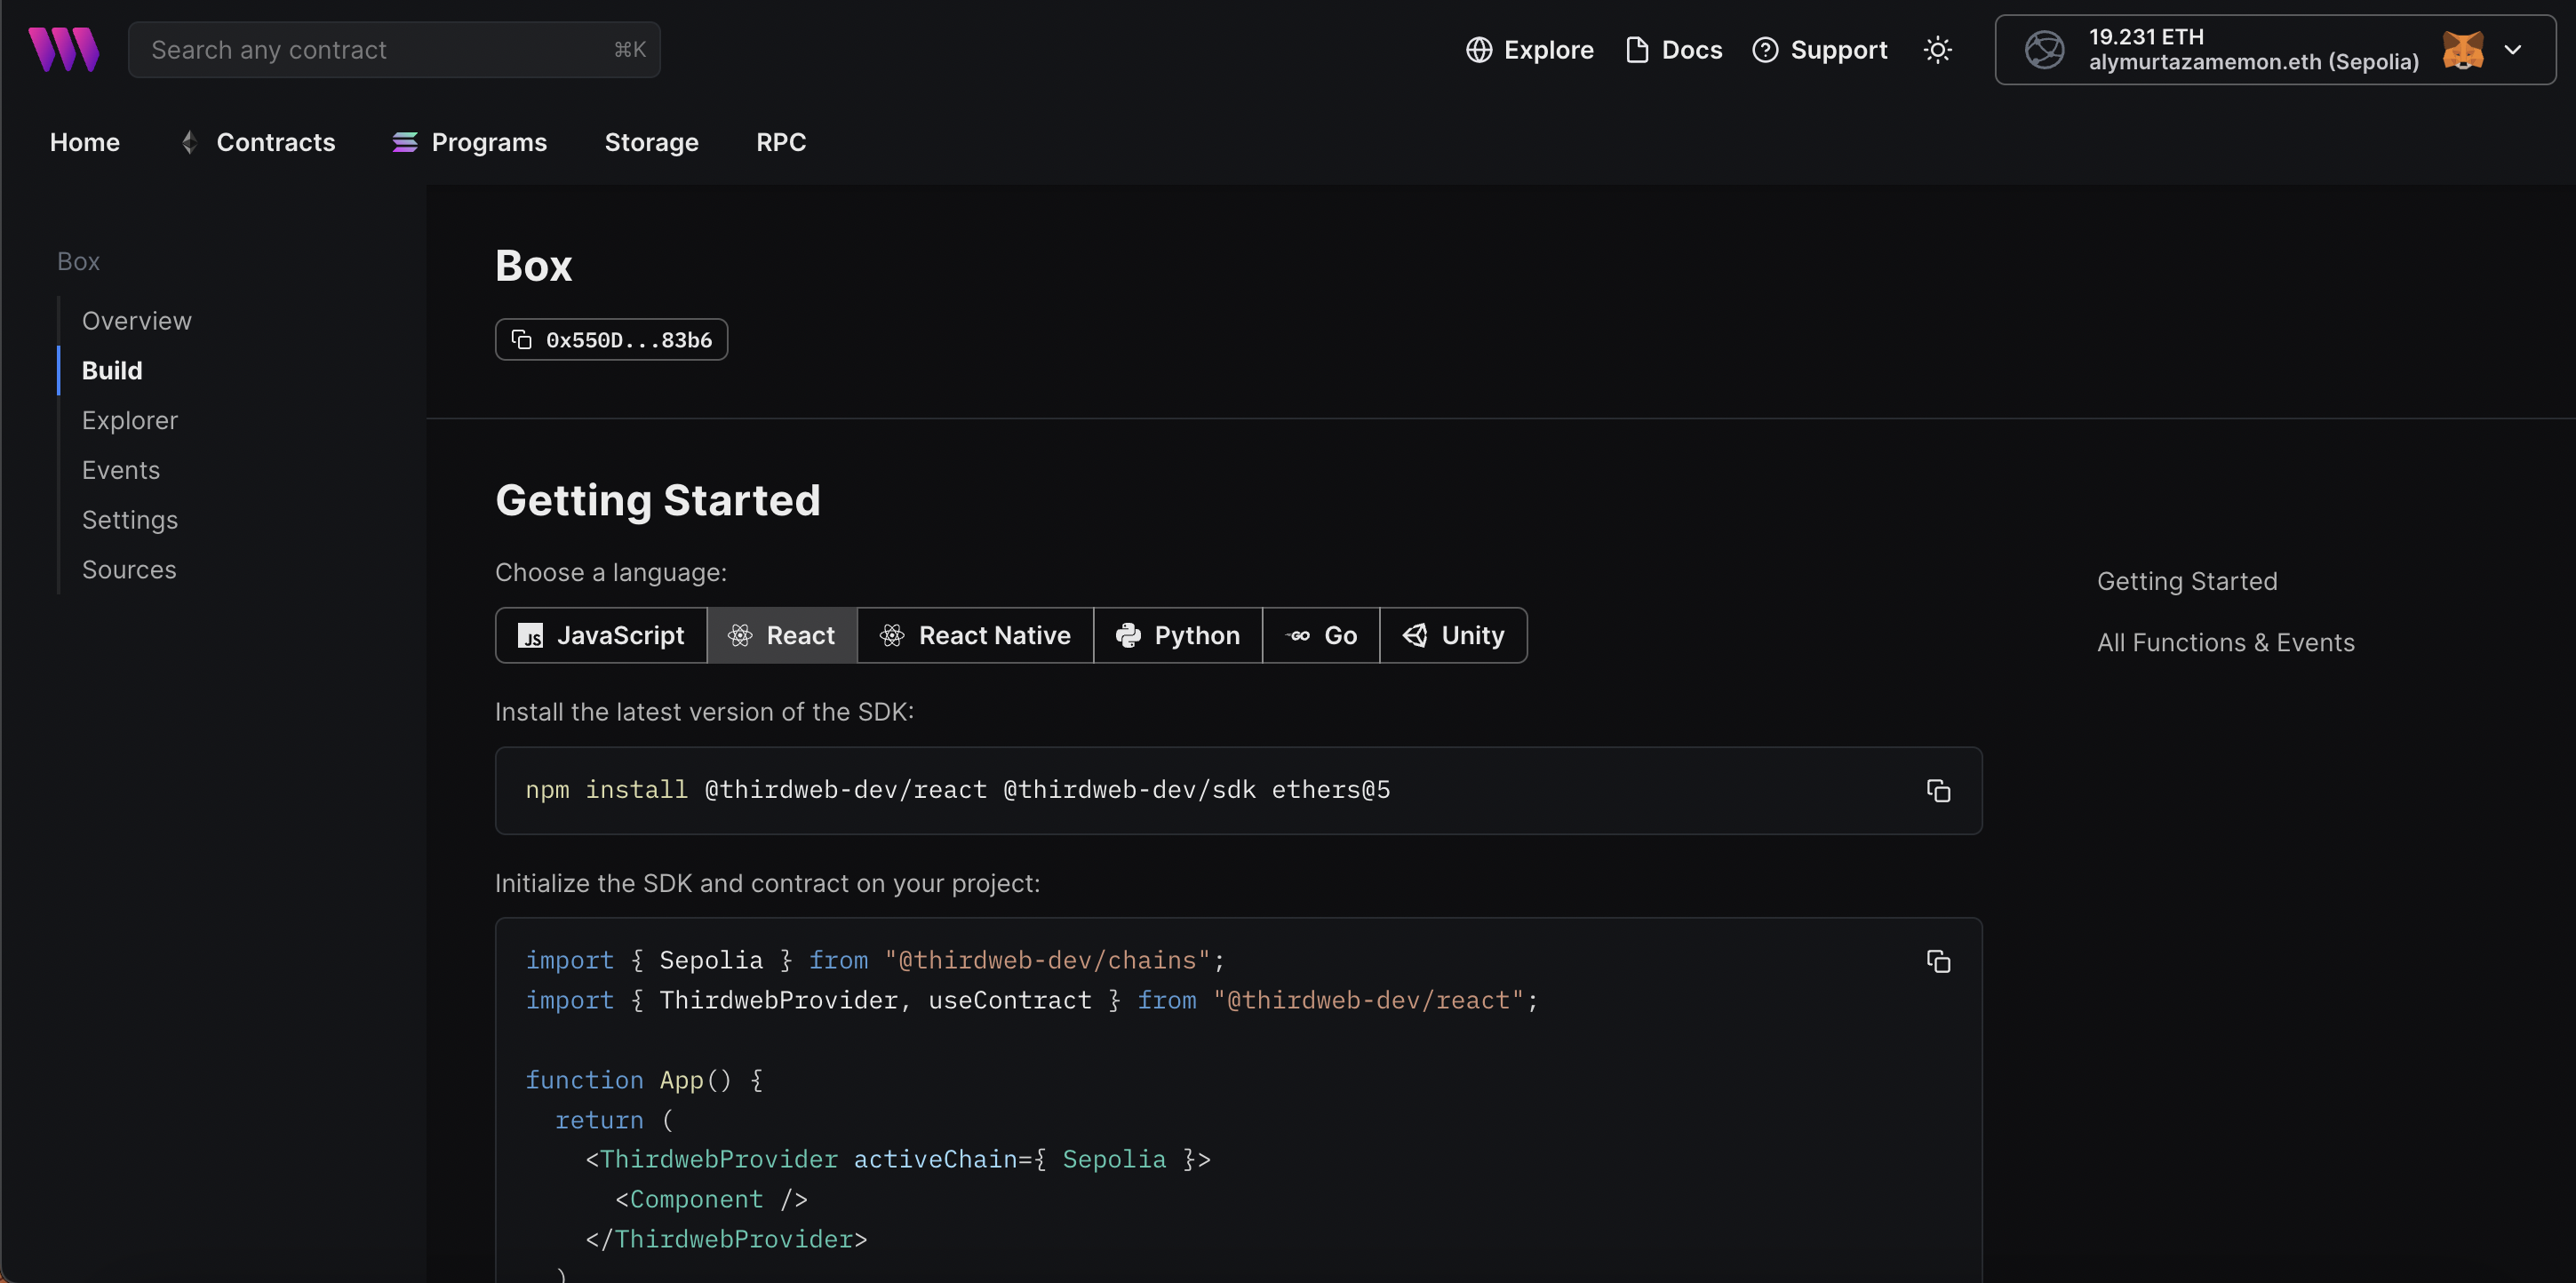
In the Build tab, you can find information on how to interact with your smart contract using various programming languages and frameworks such as JavaScript, React, Python, and Unity. It provides code snippets that illustrate how to read and write to the smart contract using these languages or frameworks. This can be useful for developers who want to integrate their smart contracts with their existing projects or application.
Explorer Tab
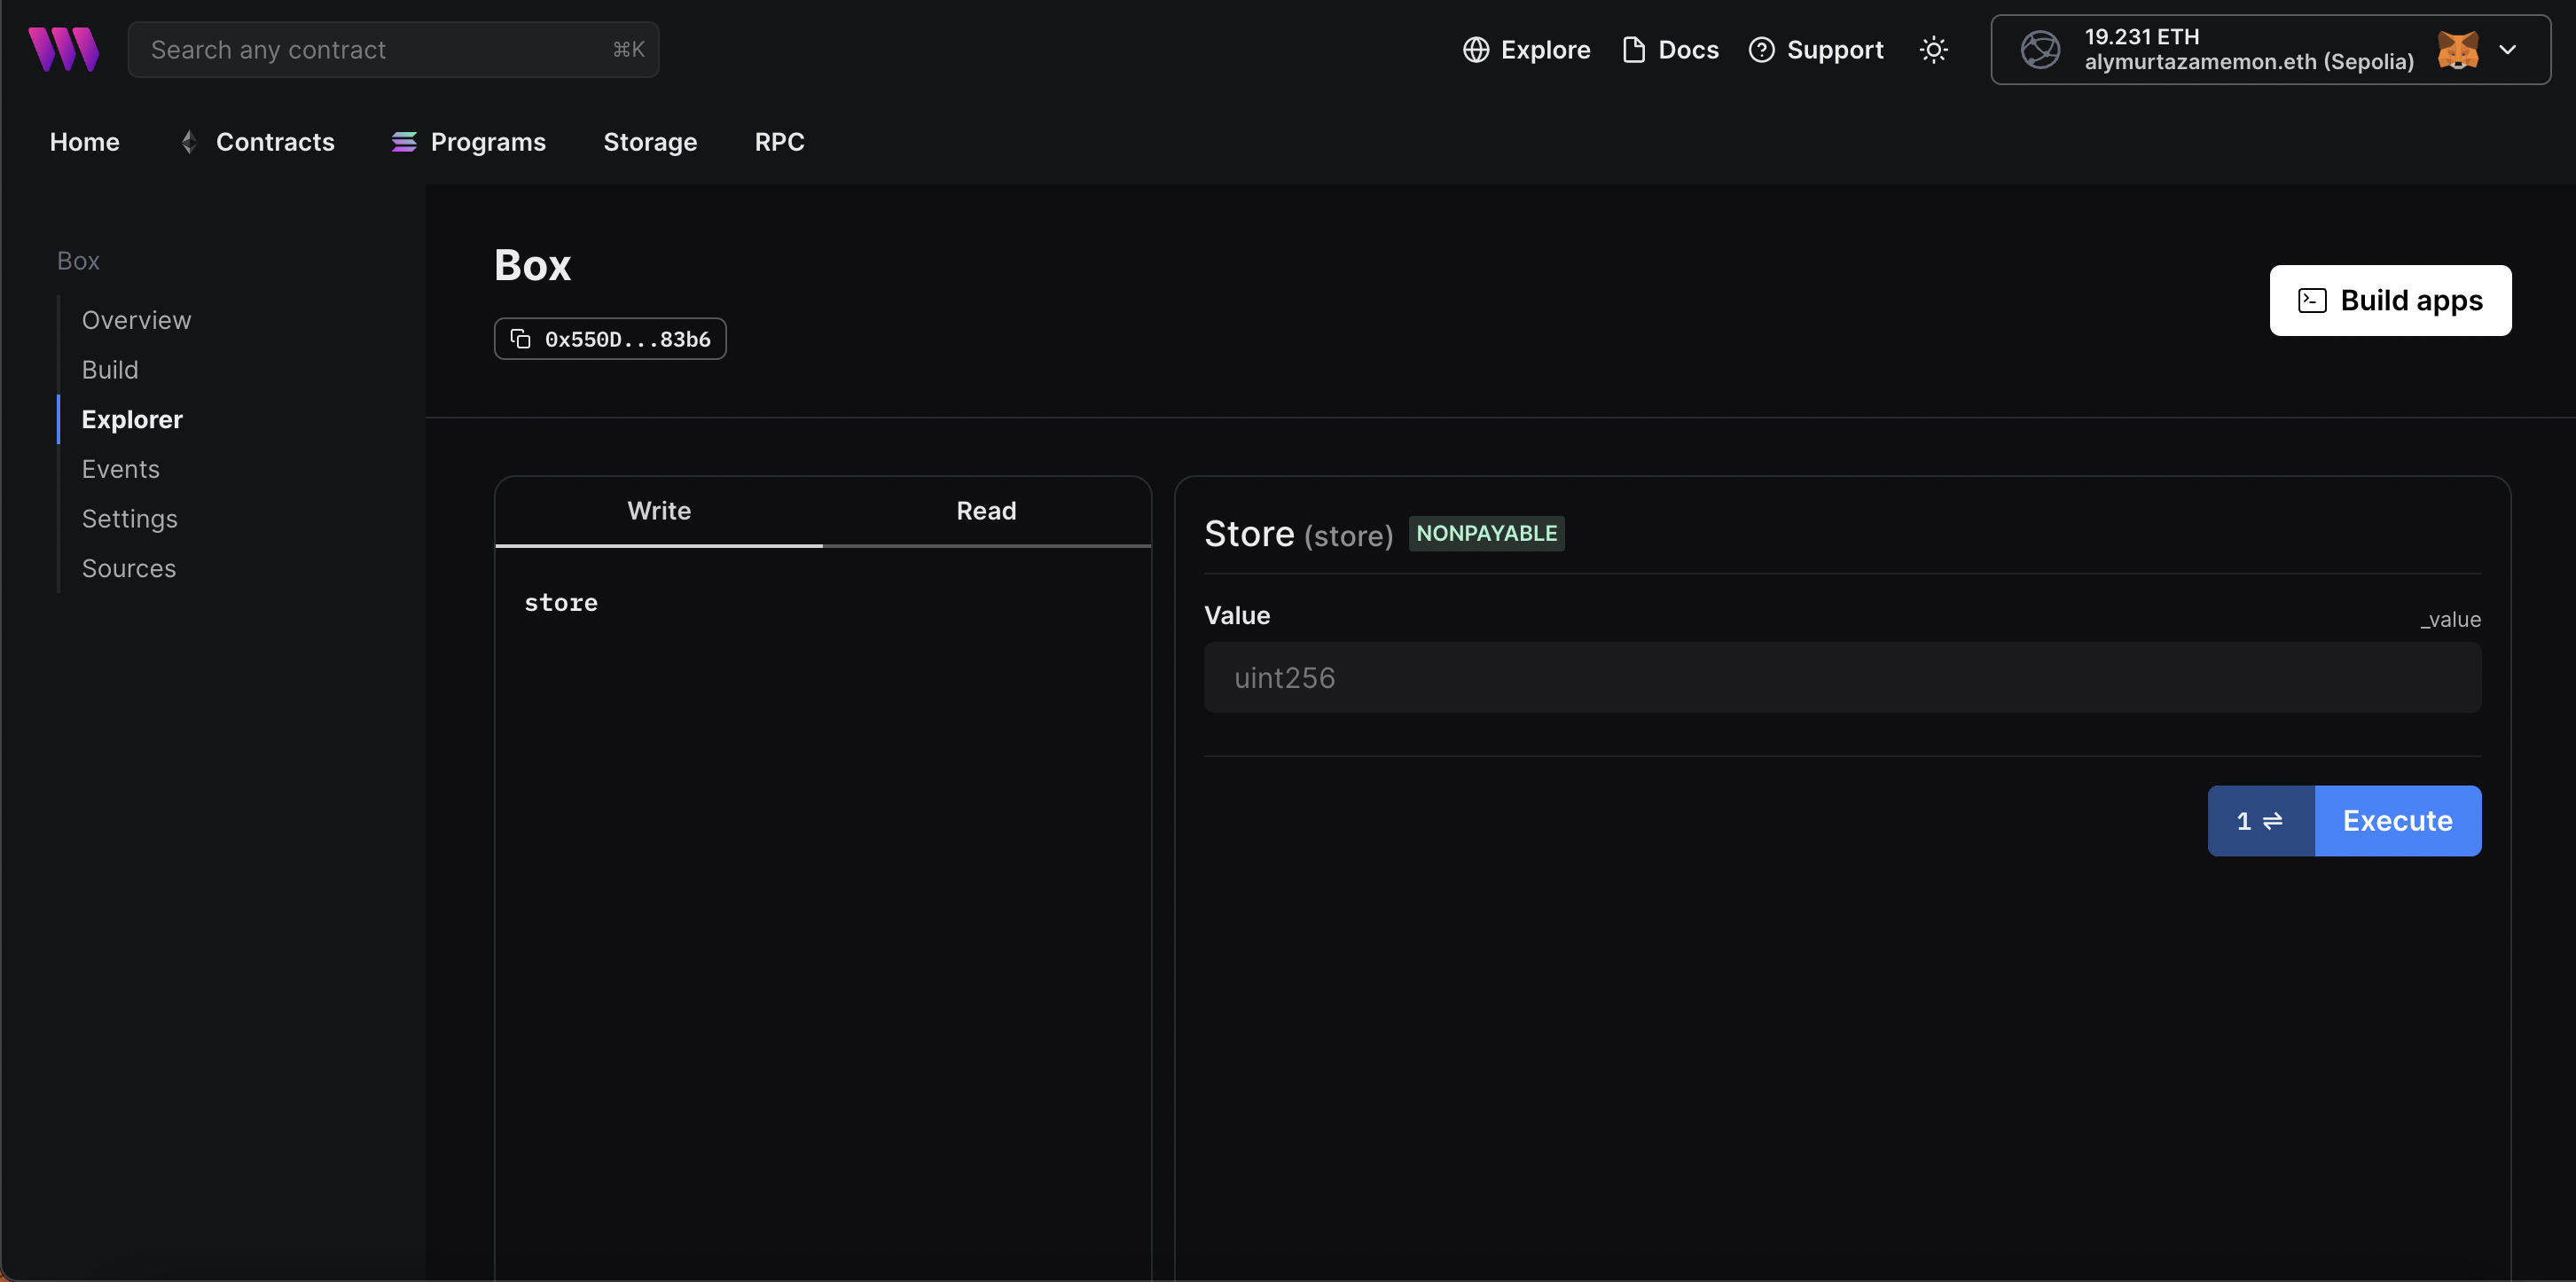
It is important to note that the Explorer tab provides an overview of the functions available in the smart contract, both the read-only functions (also known as constant functions) and the write functions.
When you click on a write function, such as the store function in our Box contract, the Explorer tab will display information about the function, including its name, input parameters, and whether it is payable or non-payable. It will also provide a text field where you can input the data that will be passed to the function when it is executed.
By providing the required input data and clicking the execute button, you can directly interact with the smart contract and execute its functions from the thirdweb’s dashboard, without the need to write any code.
Events Tab
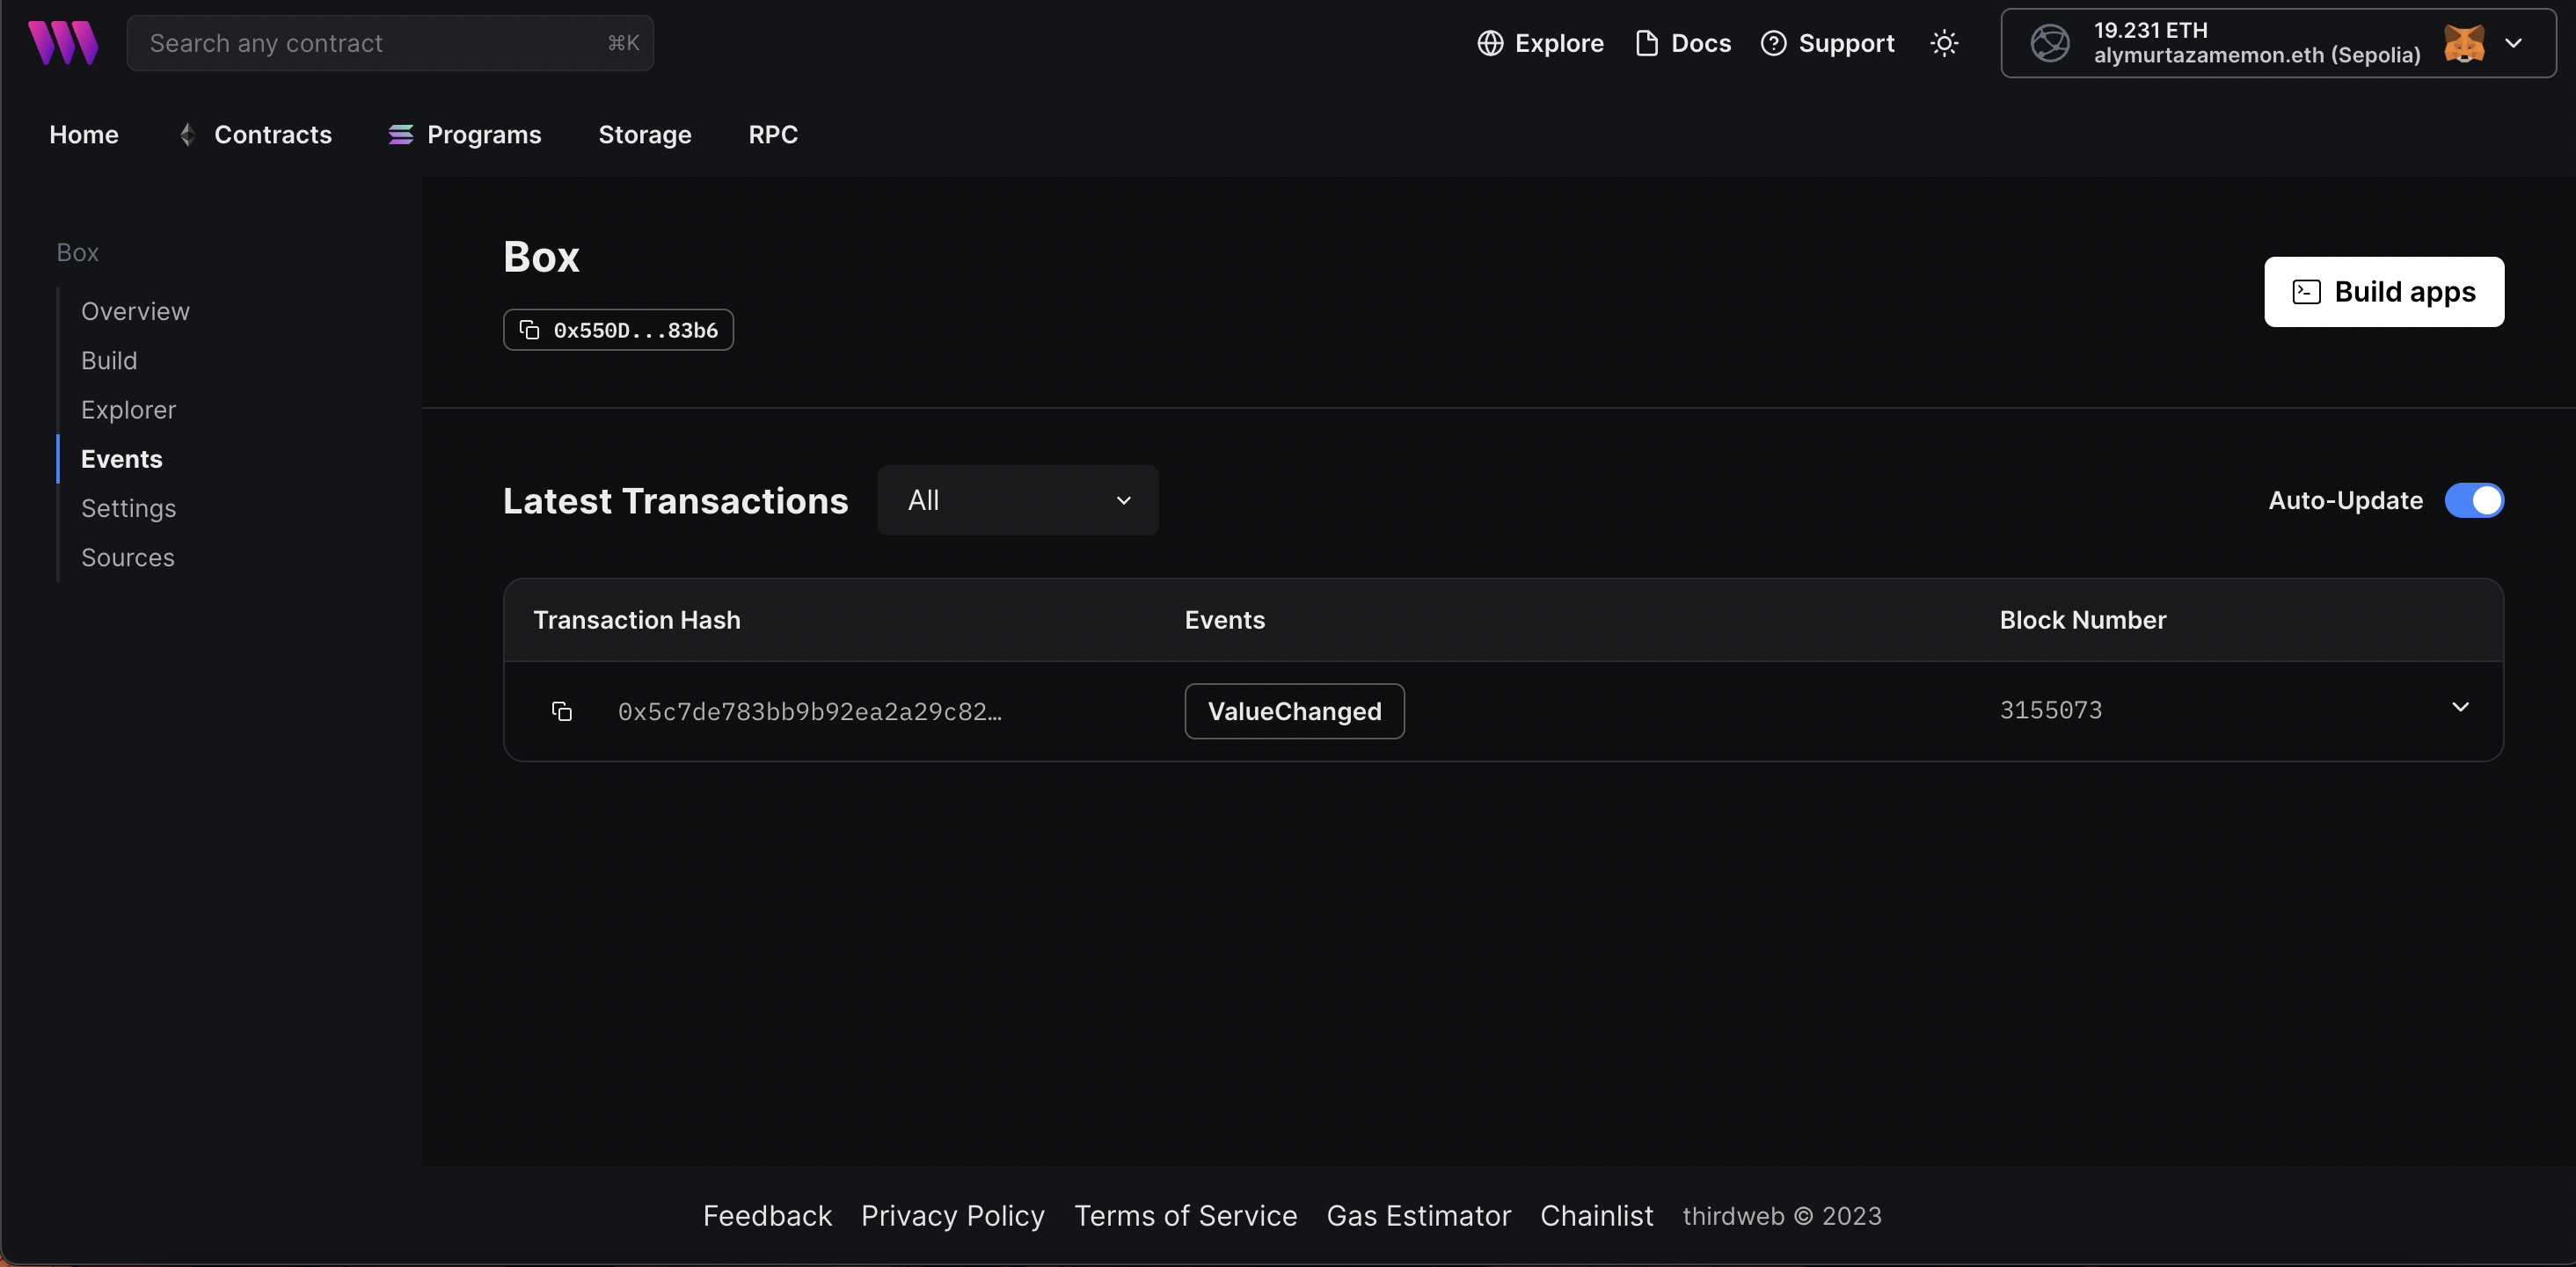
The Events tab provides a list of events that are triggered by your smart contract. When you execute the store function from the Explorer tab, the event triggered by the function can be seen in this tab.
Sources Tab
Additionally, the thirdweb dashboard provides Settings and Sources tabs that offer additional functionality. In the Settings tab, you can view and modify the project-related settings. The Sources tab, on the other hand, allows you to access the source code of your smart contract, as well as its ABI.
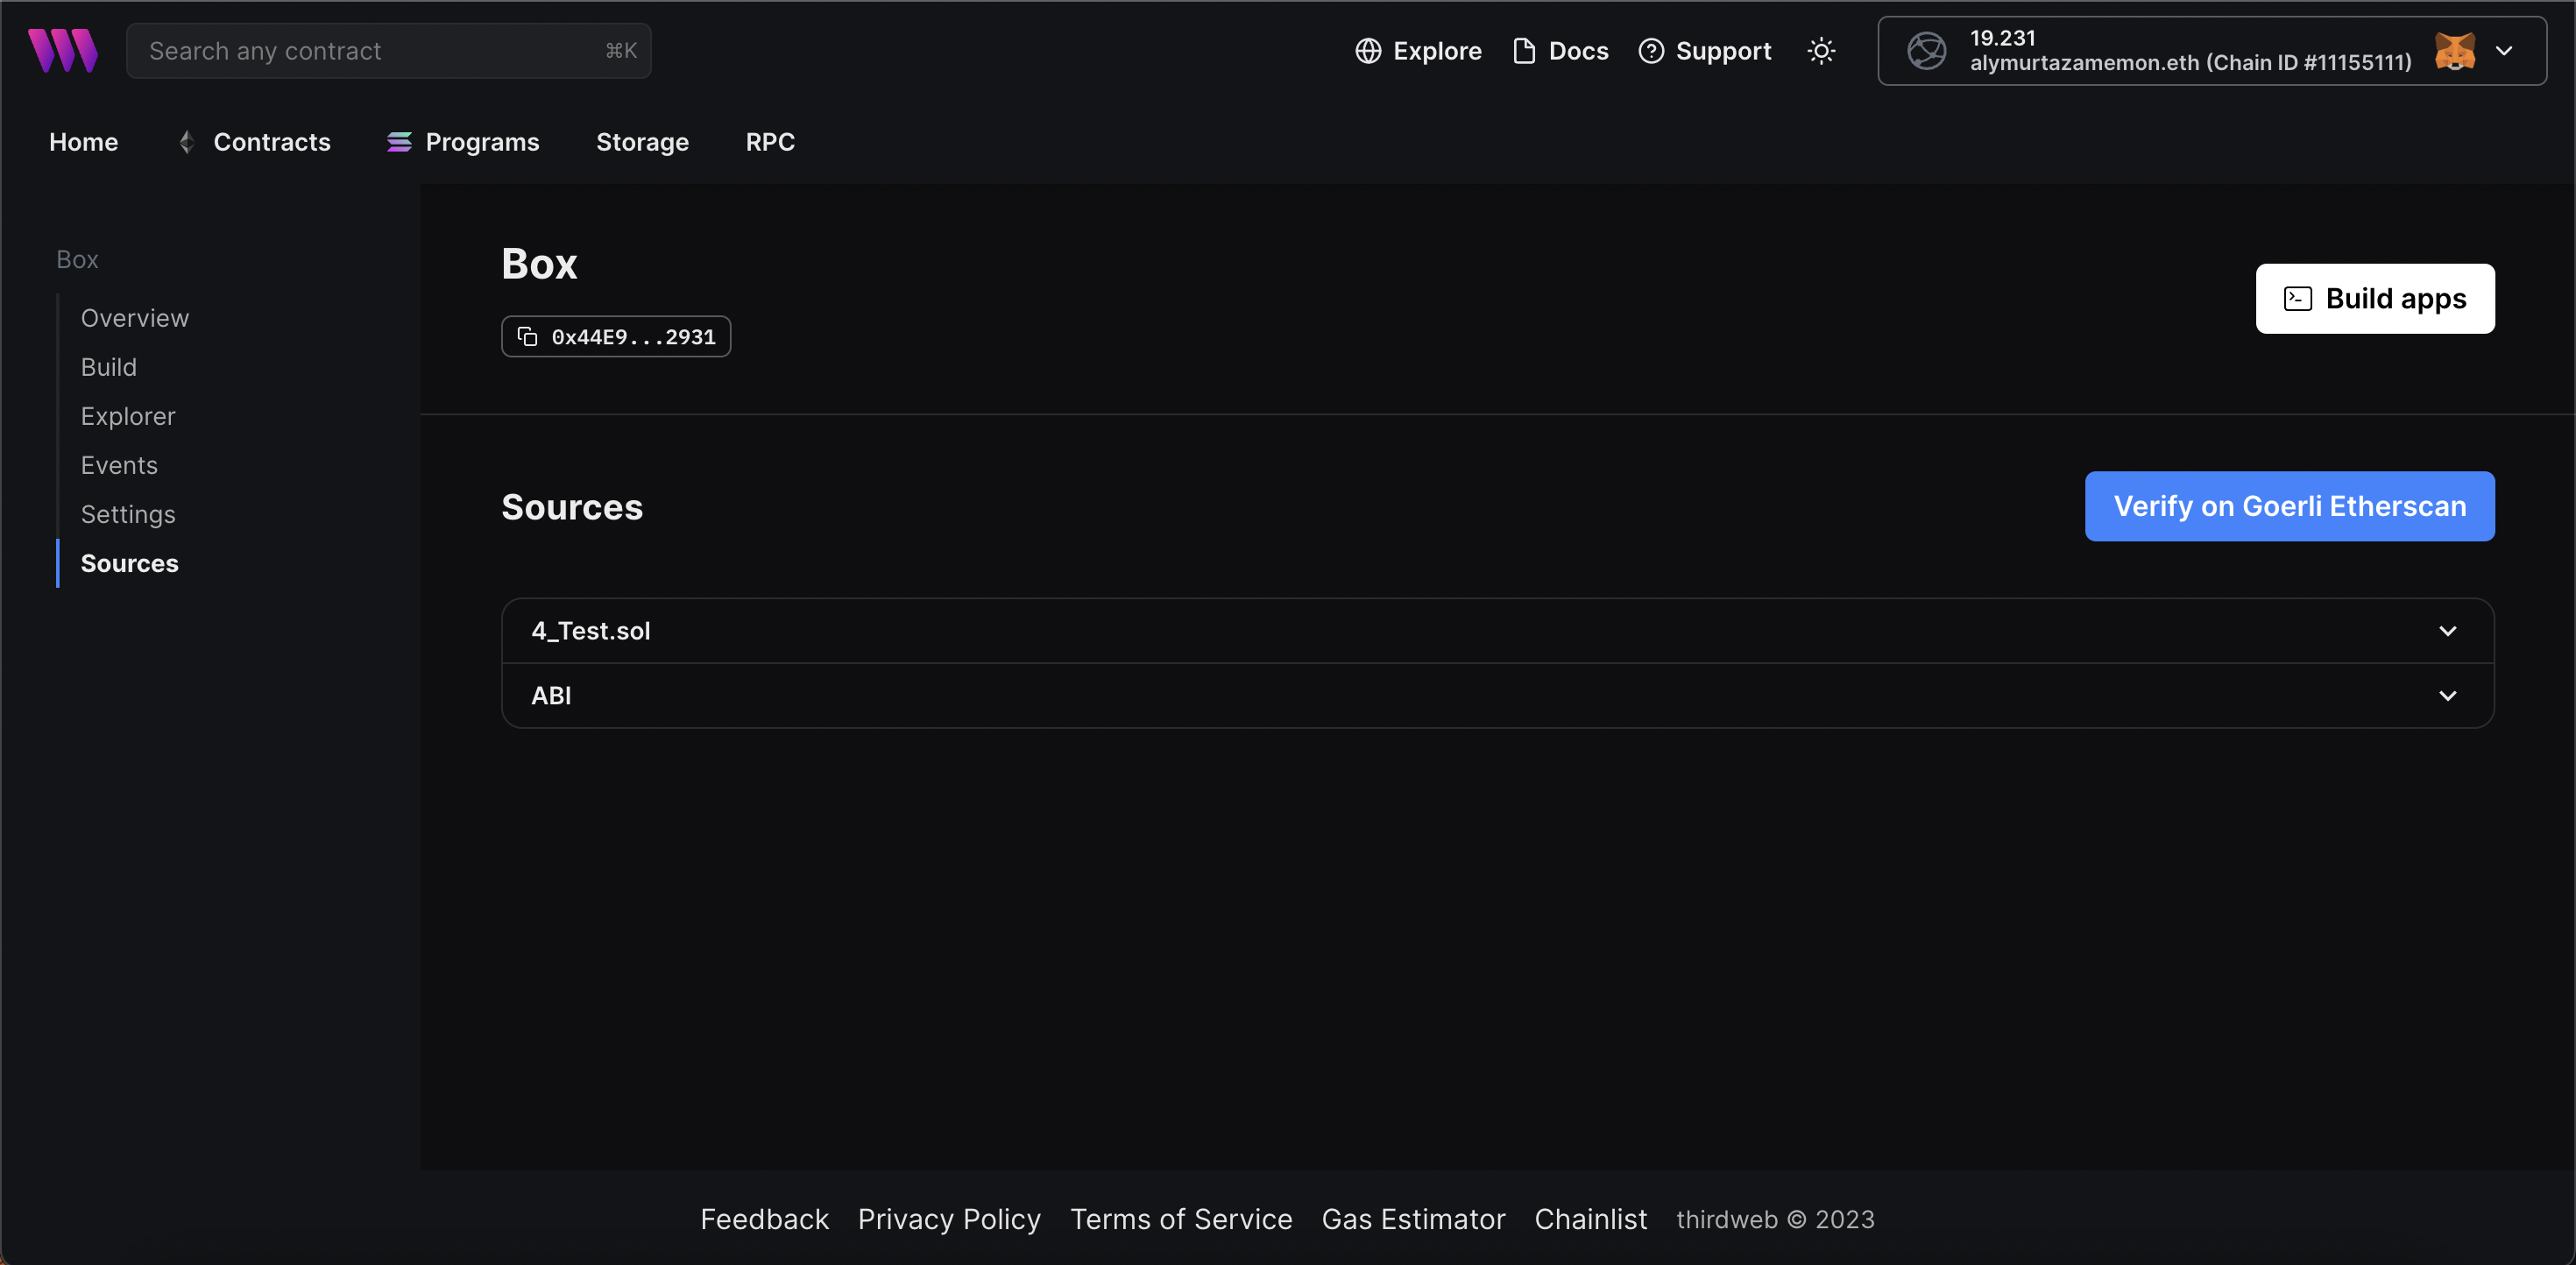
In the sources tab, you can also verify your smart contracts on Etherscan with just one click, directly from the thirdweb dashboard.
Note: Please note that I am showing you my previously deployed smart contract on the Goerli network since the option to verify contracts on Sepolia is currently unavailable.
Importing Any Contract on thirdweb’s Dashboard
Furthermore, Thirdweb provides the functionality to import any previously deployed smart contract on the blockchain into the Thirdweb dashboard for further usage and interaction.
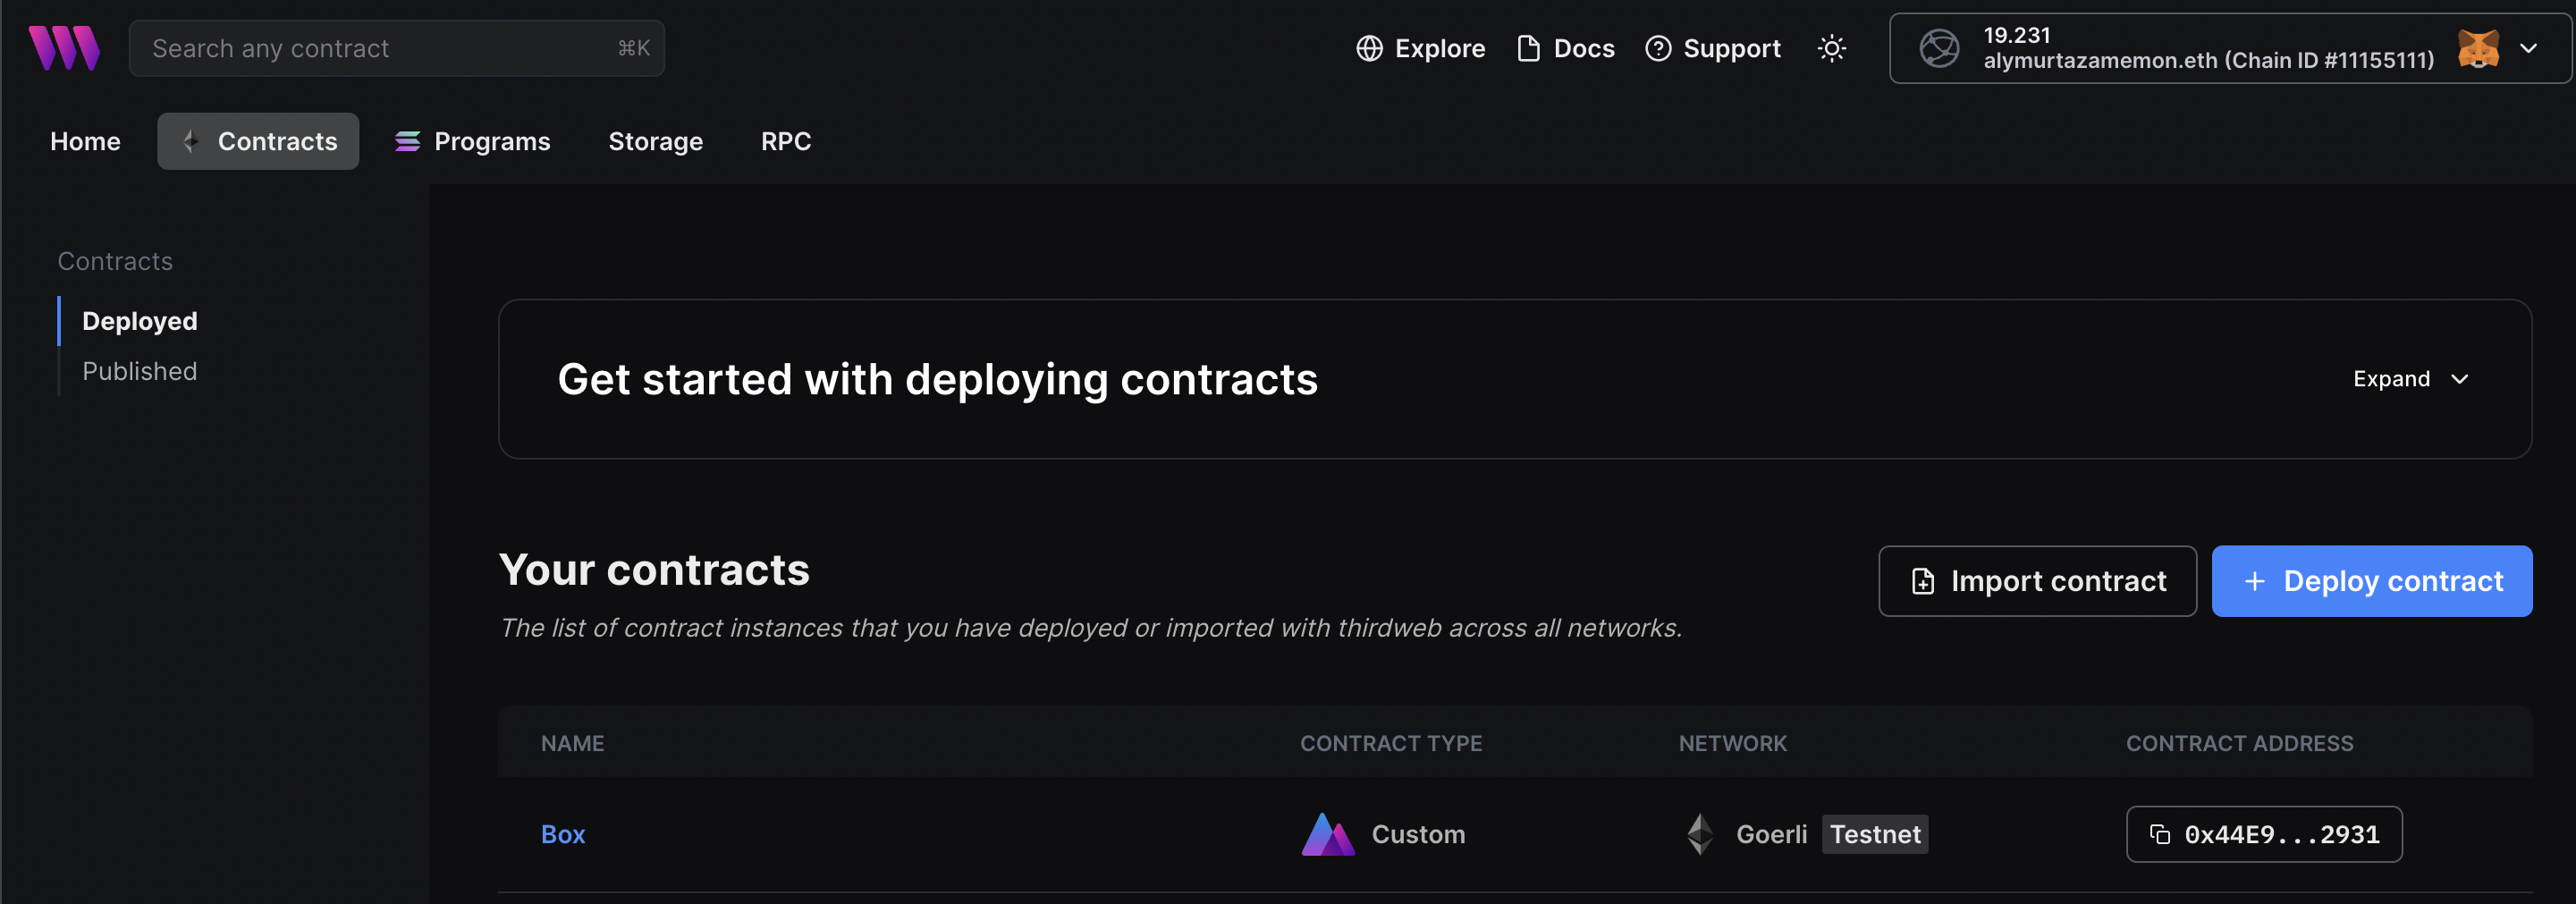
You can view your contract here;
Contracts Dashboard: https://thirdweb.com/dashboard/contracts
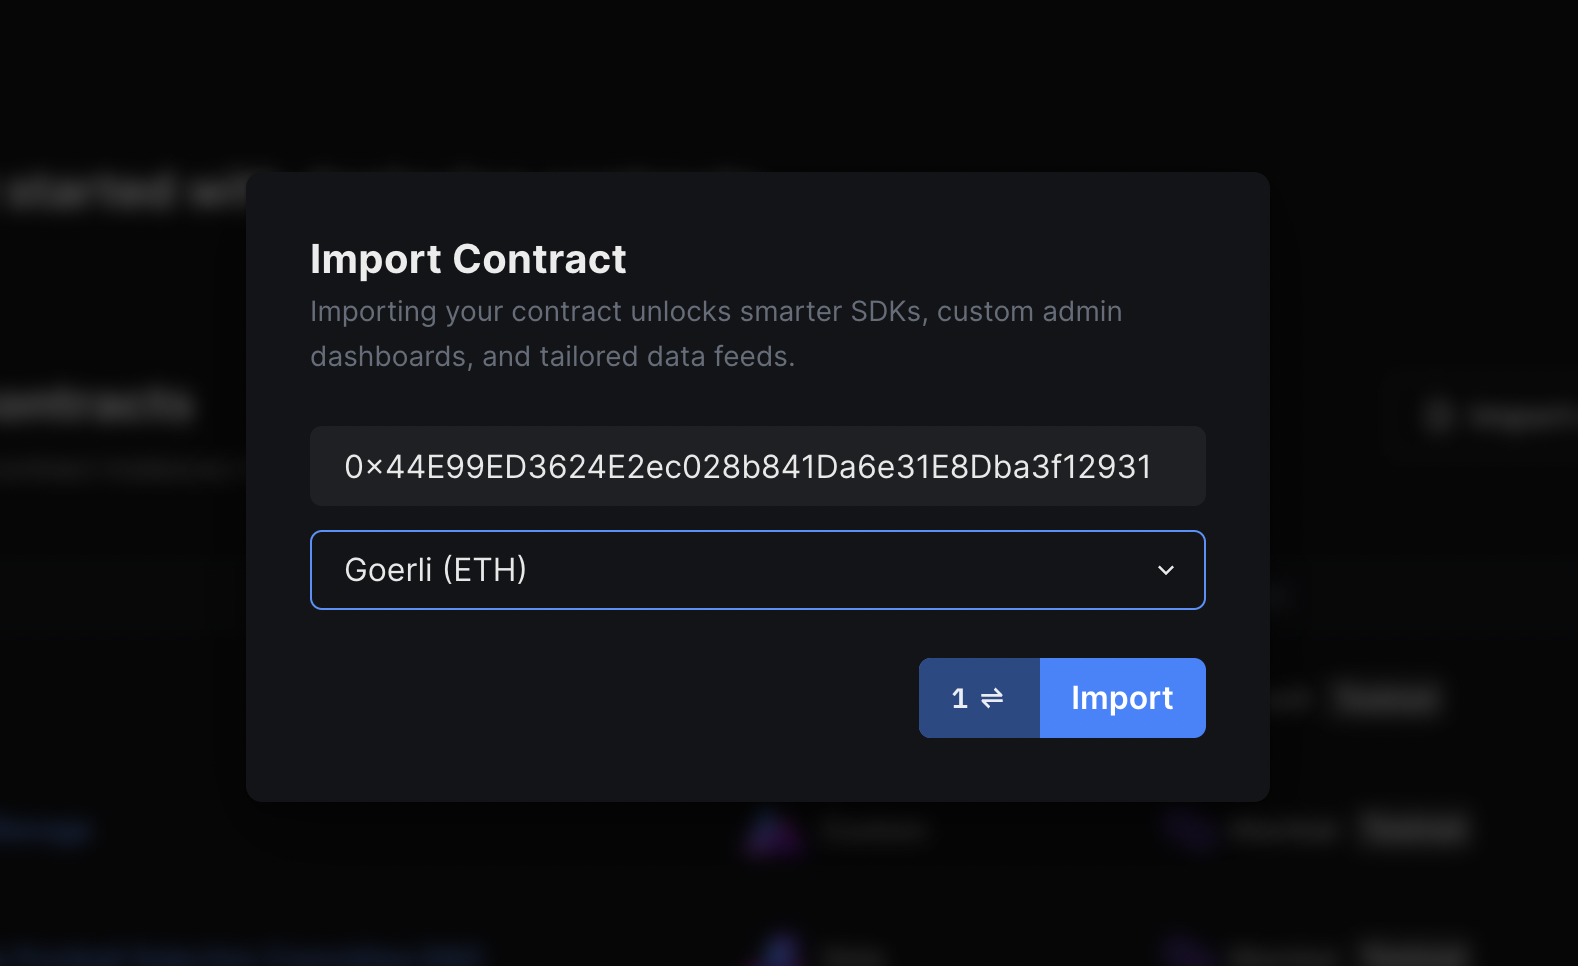
Clicking on the “Import Contract” button will bring up a popup window where you can enter the address of the deployed contract and select the network it was deployed on.
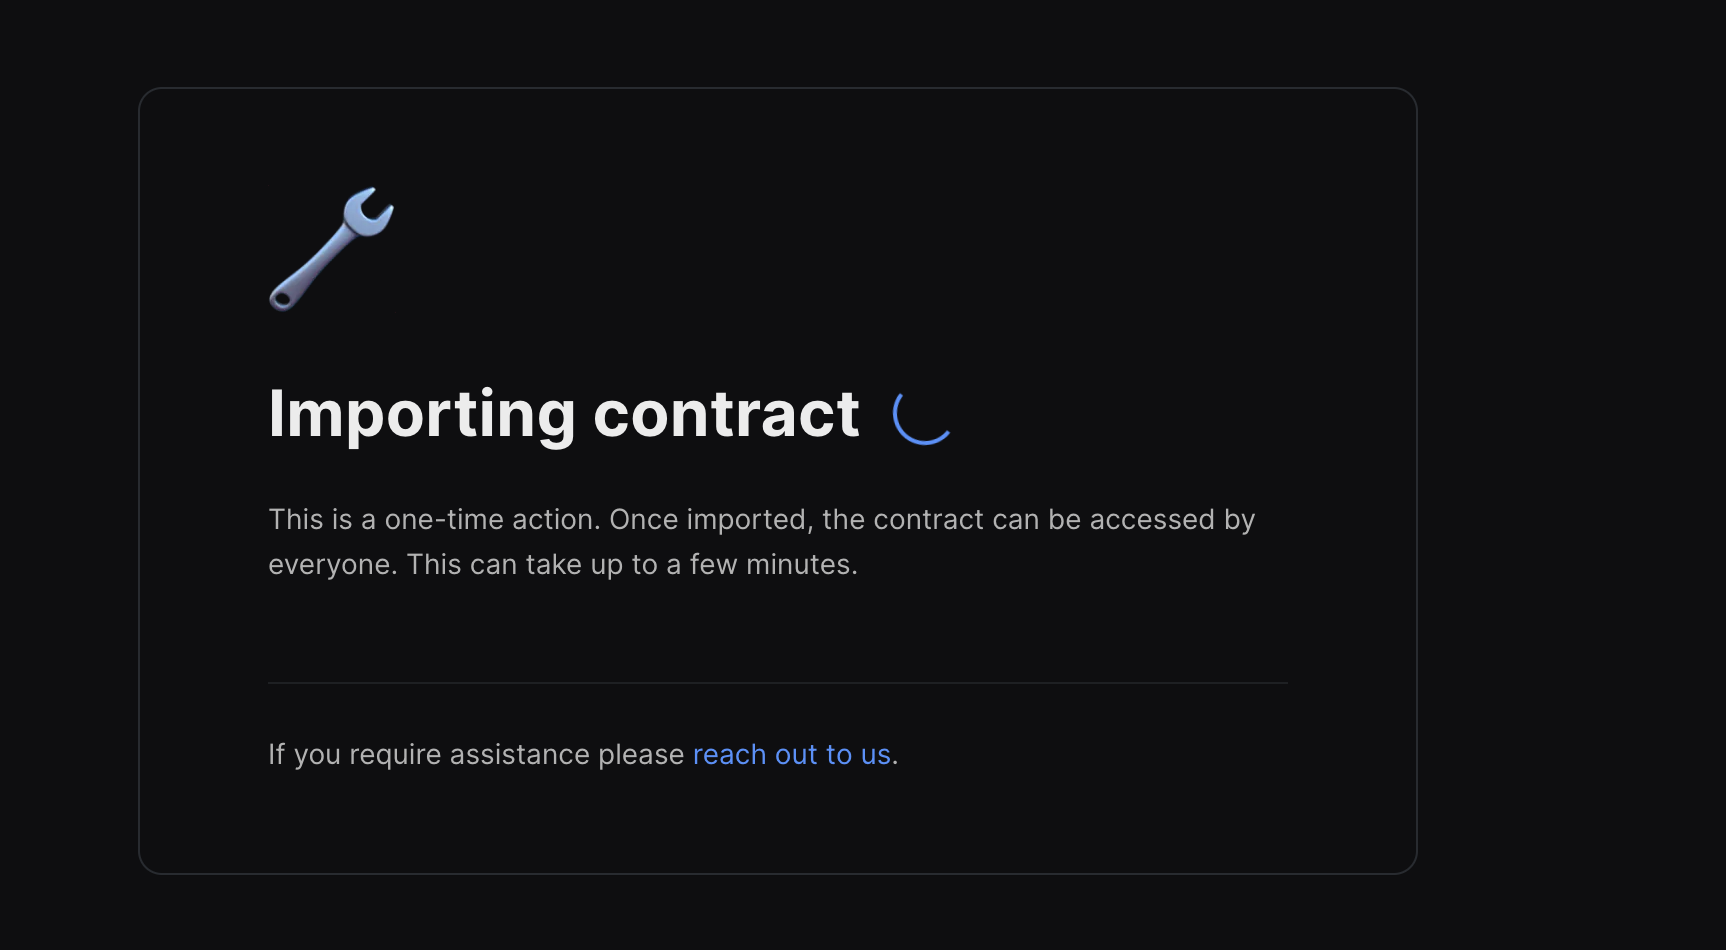
After clicking the “Import” button, thirdweb will retrieve comprehensive information about the targeted smart contract and display it in the dashboard, allowing for seamless use of the contract.
NOTE: It is critical to ensure that the smart contract being imported is verified in order for thirdweb to retrieve relevant details accurately. As a result, it is strongly advised that the contract be verified before beginning the import process.
You can read more about this feature from thirdweb’s blog post on ‘Any EVM, Any Contract’
Conclusion
In conclusion, thirdweb provides a user-friendly and efficient platform that enables developers to deploy smart contracts on any EVM chain seamlessly. By leveraging thirdweb’s robust features and capabilities, users can easily import, deploy, and interact with smart contracts, regardless of the underlying blockchain network. With thirdweb’s intuitive interface, developers can focus on building and refining their smart contract applications, while leaving the complexities of blockchain technology to the platform. As such, thirdweb offers an accessible and reliable solution for anyone seeking to harness the potential of smart contracts on EVM chains.
This comprehensive guide aims to provide assistance to developers of all skill levels and is intended to be beneficial for a wide range of developers. Despite its length, the information provided is intended to be easily understandable and actionable for all readers.
If you found this content helpful, please consider giving it a clap and leaving any feedback for future improvements. Your suggestions and comments are greatly appreciated and will help make these articles even more valuable for you and other readers.
Be sure to follow me to receive updates on my future articles and stay informed of new content.
Thank you


