Learn to Deploy Smart Contracts more Professionally with Hardhat
“A Step-by-Step Guide for Advanced Smart Contract Deployment”

Hello, I hope you are doing well!
Thanks for your interest in reading about me.
👨💻 Im a skilled Software Engineer specializing in Full Stack Web3 (Blockchain) applications and Frontend Web Applications. Currently, I am pursuing a Master's in Web Engineering at Technische Universität Chemnitz, Saxony, Germany.
🚀 I have been coding since 2017. I loved building Full Stack Web3 applications, securing them from vulnerabilities, and learning new threats related to smart contracts.
❤️ I have also helped thousands of people in open-source communities to learn, build, and secure blockchain applications.
Before diving into the blockchain field, I had worked as a Full Stack Flutter developer in a firm in Pakistan for almost 1 year after graduation. There I worked on many enterprise-level applications and developed them using Flutter & Dart for Mobile, and Web.
In addition to that, in these 7 years of my software development period, I learned many tools, languages, frameworks, and libraries including Java, Python, JavaScript, TypeScript, Dart, Solidity, React, Next.js, Flutter, Git, Node.js, Express.js and many others and built really cool products for the need and fun purpose.
I am looking forward to excelling in the web2 web3 industries personally and helping others to achieve the same level.
Thanks 🙏
Hardhat is an open-source development environment for Ethereum smart contracts. It allows developers to test, debug and deploy their contracts on a local Hardhat network, providing a safe and secure environment for experimentation and development.
One of the key features of Hardhat is its built-in Hardhat network, which allows developers to deploy and test their contracts without the need for a live network. This eliminates the risk of deploying untested code to the mainnet and incurring costly errors.
But when it comes to deployment, this is what their statement is;
There are no official plugins that implement a deployment system for Hardhat yet. We are working on it.
In the meantime, we recommend deploying your smart contracts using scripts or using the hardhat-deploy community plugin.
This means either we can use this type of Hardhat script to deploy our smart contracts.
EXAMPLE OF Lock SAMPLE CONTRACT;
const hre = require("hardhat");

async function main() {
  const currentTimestampInSeconds = Math.round(Date.now() / 1000);
  const ONE_YEAR_IN_SECS = 365 * 24 * 60 * 60;
  const unlockTime = currentTimestampInSeconds + ONE_YEAR_IN_SECS;

  const lockedAmount = hre.ethers.utils.parseEther("1");

  const Lock = await hre.ethers.getContractFactory("Lock");
  const lock = await Lock.deploy(unlockTime, { value: lockedAmount });

  await lock.deployed();

  console.log(
    `Lock with 1 ETH and unlock timestamp ${unlockTime} deployed to ${lock.address}`
  );
}

main().catch((error) => {
  console.error(error);
  process.exitCode = 1;
});
or we can use the hardhat-deploy community plugin to deploy our contracts more professionally.
When working with smart contract scripts, there are several scenarios where the script process can become a headache for developers. Here are a few examples:
When deploying a large number of smart contracts, the process can become quite cumbersome, especially when using the default Hardhat deploy script. The script must be run individually for each contract, which can be time-consuming and prone to errors ( One approach to mitigate this issue is to create a separate script that can deploy all of the contracts together. While this can be an effective solution, it may not be ideal in situations where only a subset of the contracts need to be deployed. In such cases, it would be necessary to manually select which contracts to include in the deployment script, which can be time-consuming and prone to errors).
When testing smart contracts, it is often necessary to deploy the contracts on a test network before running the tests. This can be a time-consuming and error-prone process, especially when dealing with complex projects with a large number of smart contracts. Hardhat provides a way to manage this process with fixtures, but even with this feature, developers still need to write deploy fixtures functions at the start of the test script. This can be a headache when dealing with complex projects with many smart contracts.
To mitigate these issues, it is important to adopt a more professional approach in order to overcome the challenges and headaches that can arise during the deployment process.
The solution? “The hardhat-deploy community plugin, as suggested by Hardhat documentation, provides a comprehensive solution for streamlining the deployment process of smart contracts, eliminating the challenges and headaches that can arise during the process.”
Let’s explore the process of deploying smart contracts utilizing the Hardhat Deploy community plugin, and learn how to effectively utilize its features to streamline the deployment process.
Here is an example of a basic smart contract written in Solidity:
// SPDX-License-Identifier: MIT
pragma solidity ^0.8.17;

contract SimpleStorage {
    uint private storedData;

    function set(uint x) public {
        storedData = x;
    }

    function get() public view returns (uint) {
        return storedData;
    }
}
This contract, called SimpleStorage, has two functions: “set” and “get”. The “set” function allows you to store a value (in this case, a uint, or unsigned integer) in the contract’s storage, and the “get” function allows you to retrieve the stored value.
To deploy this contract using the hardhat-deploy plugin, you will first need to set up a local development environment. Follow these steps:
Install Node.js and npm (Node Package Manager) on your computer.
Install Hardhat by running the command “npm install -g hardhat” in your terminal.
Create a new directory for your project and navigate to it in your terminal.
Run the command “npx hardhat” to set up a new Hardhat project in your current directory. This will show you these options;
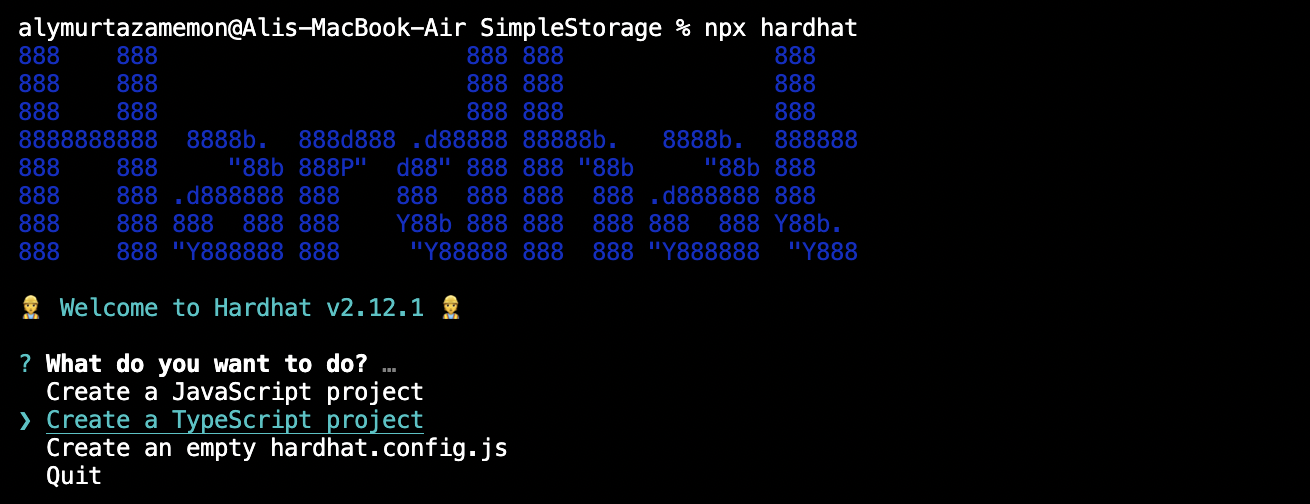
Select the “Create a JavaScript project” or “Create a TypeScript project” option.
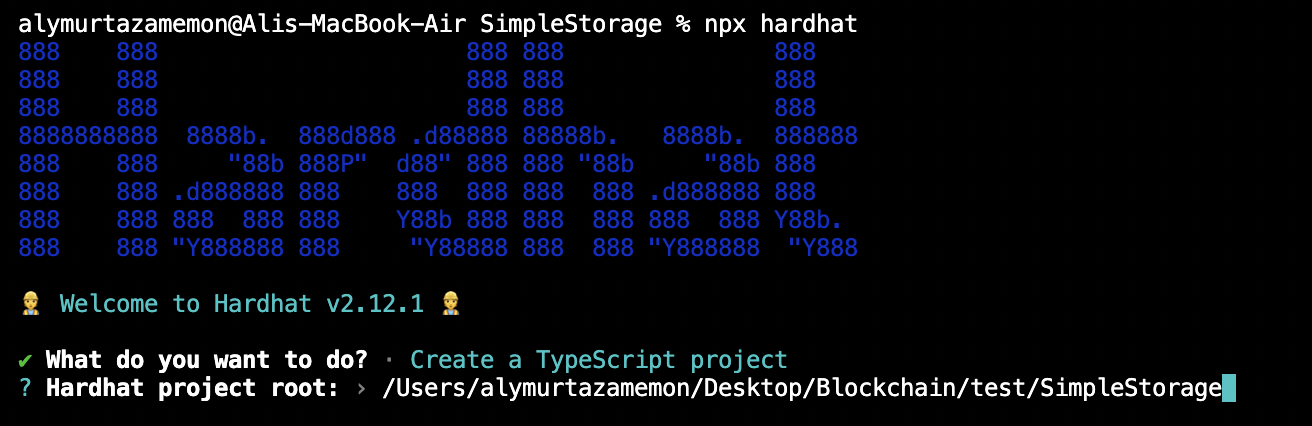
Upon executing the command, the plugin will prompt for the root location of the project. Simply press the tab key to confirm the default location and press Enter.
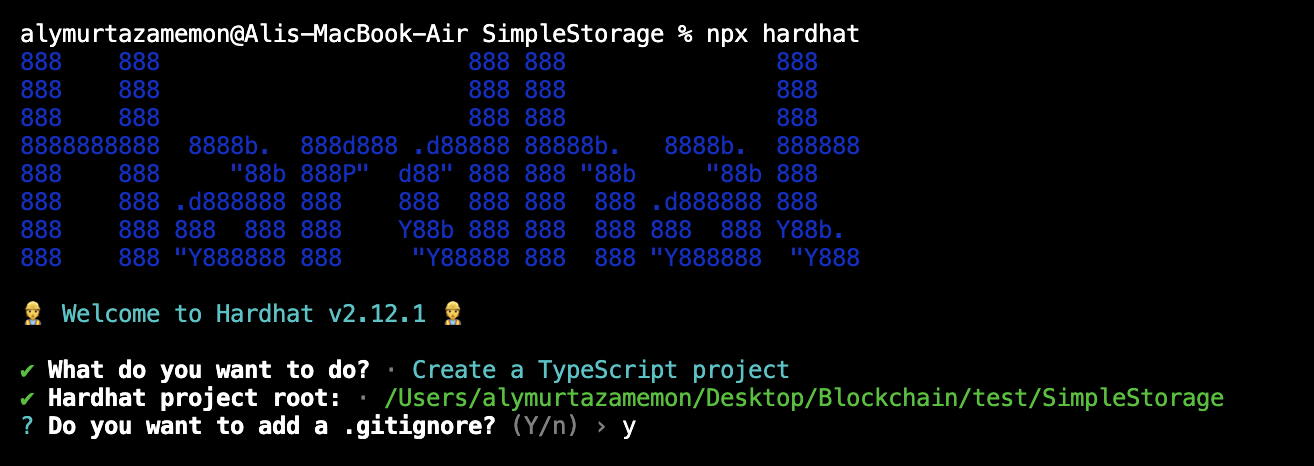
The plugin will then prompt for the inclusion of a .gitignore file, you can choose to add it by typing ‘y’ or to skip it by typing ’n’ depending on your preference.
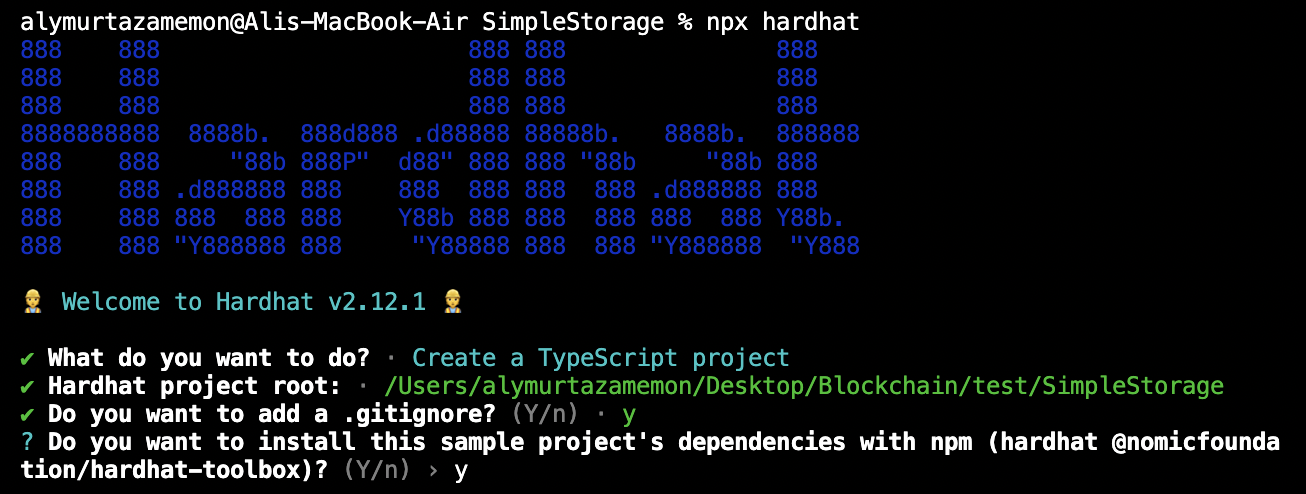
The plugin will then prompt to install the @nomicfoundation/hardhat-toolbox plugin, you can choose to install it by typing ‘y’ or to skip it by typing ’n’ depending on your requirement.
With the local development environment now set up, we can proceed with deploying the contract utilizing the Hardhat Deploy plugin. Before doing so, it is recommended to remove the default contract, script and test files provided by Hardhat. These files can be found in the contracts/, scripts/, and test/ folders, they should be removed to avoid confusion and potential errors.
In order to utilize the Hardhat Deploy plugin, it must first be installed. To do this, run the command in the terminal or command prompt.
npm install -D hardhat-deployThe Hardhat Deploy plugin recommends installing
hardhat-deploy-ethersto access additional features related to deployments as ethers contract. However, it is important to note that ashardhat-deploy-ethersis a fork of@nomiclabs/hardhat-ethers, other plugins might have a hardcoded dependency on@nomiclabs/hardhat-ethers. To ensure compatibility, it is recommended to installhardhat-deploy-ethersby following the commandnpm install — save-dev @nomiclabs/hardhat-ethers@npm:hardhat-deploy-ethers ethersAdd the following statement to your
hardhat.config.js:```javascript // JavaScript require('hardhat-deploy');
// TypeScript
import "hardhat-deploy";
```
Now if you run the command
npx hardhat --helpit will reveal a new task available, named 'deploy', which will be used to deploy the smart contracts.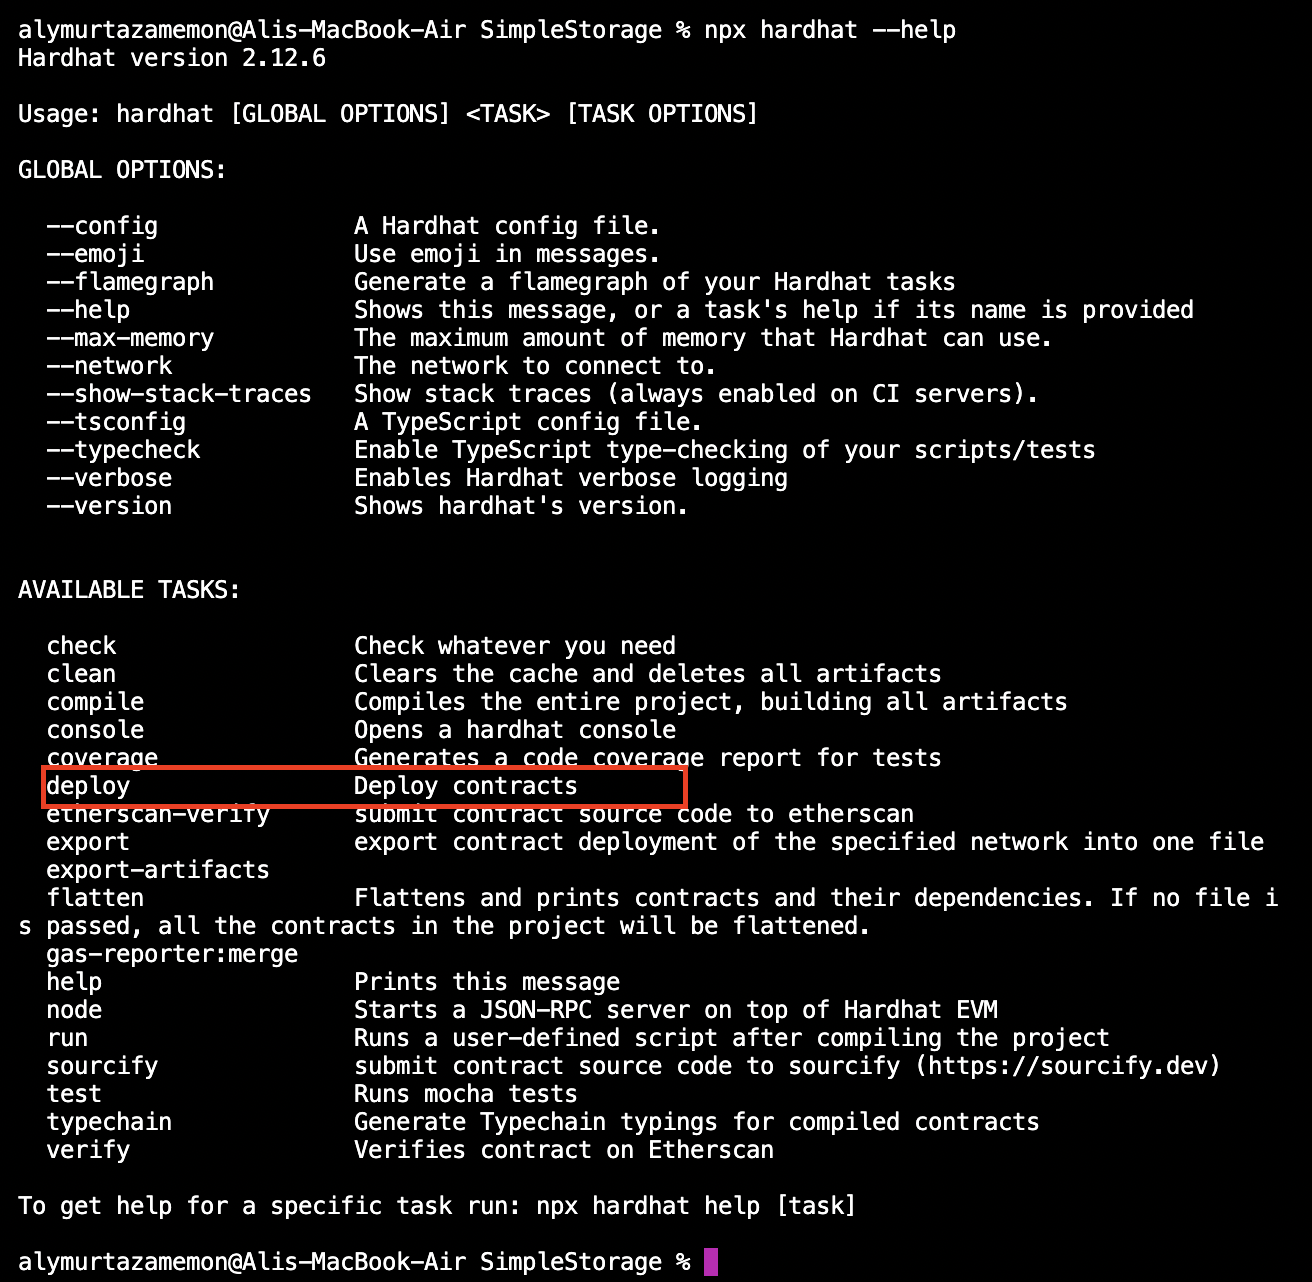
To proceed with the deployment process, a new folder named ‘deploy’ should be created, and a new file, named
01-deploy-simple-storage.tsor01-deploy-simple-storage.js, should be created within it. It is important to ensure that the SimpleStorage contract is added to the ‘contracts’ folder and namedSimpleStorage.solbefore proceeding. The structure will look like this (I am using Typescript);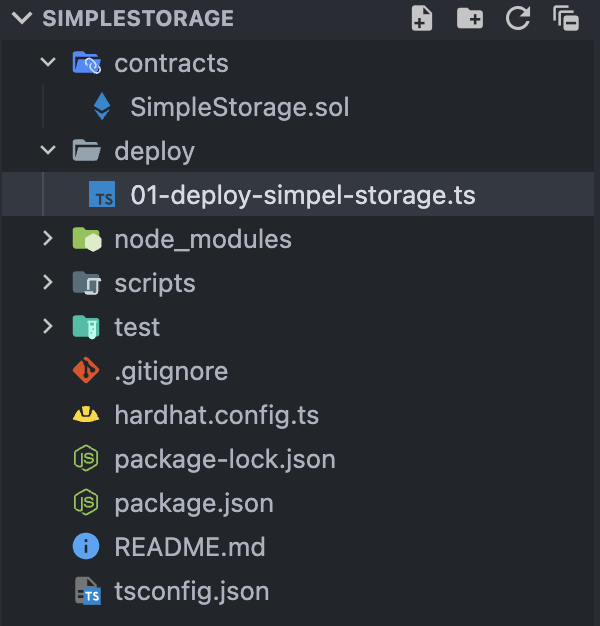
Why are we adding the 01 prefixes to the file?
The inclusion of numerical prefixes, such as ‘01’, before the file names serves the purpose of indicating the sequence in which the deployment scripts should be executed when utilizing the ‘npx hardhat deploy’ task command. This ensures that all scripts present within the ‘deploy’ folder are executed in a specific order. Although this is a simple example with one smart contract, it is important to note that when working with multiple smart contracts, this method allows for a clear and organized structure, ensuring that the contracts are deployed in a specific sequence.
6. The following code should be added to the previously created deployment file, depending on the language being used, either JavaScript or TypeScript.
 // TypeScript
 import { DeployFunction, DeployResult } from "hardhat-deploy/dist/types";
 import { HardhatRuntimeEnvironment } from "hardhat/types";
 import { network } from "hardhat";

 /**
  * * Important Notes
  *
  * * In order to run `npx hardhat deploy --typecheck` command we need to add `import hardhat-deploy` in `hardhat.config.js` file.
  *
  */

 const deploySimpleStorage: DeployFunction = async (
     hre: HardhatRuntimeEnvironment
 ) => {
     const { deploy } = hre.deployments;
     const { deployer } = await hre.getNamedAccounts();
     const chainId = network.config.chainId!;

     const simpleStorage: DeployResult = await deploy("SimpleStorage", {
         from: deployer,
         log: true,
         args: [],
         waitConfirmations: chainId == 31337 ? 1 : 6,
     });
 };

 export default deploySimpleStorage;
 deploySimpleStorage.tags = ["all", "simpleStorage"];
// JavaScript const { network } = require("hardhat"); module.exports = async (hre) => { const { deploy } = hre.deployments; const { deployer } = await hre.getNamedAccounts(); const chainId = network.config.chainId; const simpleStorage = await deploy("SimpleStorage", { from: deployer, log: true, args: [], waitConfirmations: chainId == 31337 ? 1 : 6, }); }; module.exports.tags = ["all", "simpleStorage"];Let me explain what’s going on; (I am going to explain JavaScript but the Concepts are the same for both).
const { network } = require("hardhat");This line of code imports the network from Hardhat, which will be used to automatically detect the network being used, whether it is localhost, testnet, or mainnet, from the command used.
module.exports = async (hre) => {The code exports a deploy function, which will be passed an object, known as the Hardhat Runtime Environment, by the Hardhat Deploy plugin.
 const { deploy } = hre.deployments;
 const { deployer } = await hre.getNamedAccounts();
 const chainId = network.config.chainId;
The hre object is used to extract the deploy function from the deployments, which will assist in deploying the smart contract with specified options. The deployer is obtained through the hre’s getNamedAccounts function, and the chainId is obtained from the network.
The deployer is a label assigned to the first account on the network. To utilize this feature, the
hardhat.config.jsfile needs to be configured accordingly, as outlined below (Make sure it contains both JavaScirpt and TypeScript versions, select only one).// TypeScript const config: HardhatUserConfig = { solidity: "0.8.17", defaultNetwork: "hardhat", networks: { hardhat: { chainId: 31337, }, }, namedAccounts: { deployer: { default: 0, }, }, }; // JavaScript module.exports = { defaultNetwork: "hardhat", networks: { hardhat: { chainId: 31337, }, }, namedAccounts: { deployer: { default: 0 }, }, }With the deployer obtained, the smart contract can now be deployed using the deploy function provided by hre.deployments.
 const simpleStorage = await deploy("SimpleStorage", {
     from: deployer,
     log: true,
     args: [],
     waitConfirmations: chainId == 31337 ? 1 : 6,
 });
In this step, the smart contract’s name is provided as the first parameter of the deploy function. The second parameter of the deploy function is an object that contains additional information for deployment.
from: field within the object specifies the address of the deployer or owner of the contract.log: field within the object, if set totrue, will log information about the deployed smart contract’s address in the terminal.args: field within the object, is an array that contains the parameters required for the smart contract’s constructor. Since our smart contract in this example does not have a constructor, an empty array is passed.waitConfirmations: field within the object specifies the time delay for waiting for the confirmation of the transaction of the deployed smart contract. Here, the condition to wait for 1 block confirmation for the Hardhat chain, and 6 block confirmations for testnets or mainnets is added. This is a recommended practice.
With all necessary setup and configuration completed, the smart contract can now be deployed by executing the following command in the terminal.
```javascript
npx hardhat deploy
// deploy on goerli - make sure to setup goerli network in hardhat.config.js file before running this command.
npx hardhat deploy --network goerli
// deploy on any network - just add the network in hardhat.config.js file.
npx hardhat deploy --network <network-name>
```

The same process should be followed for deploying any additional smart contracts. Once the initial setup is completed, all contracts can be deployed simultaneously using this single command.
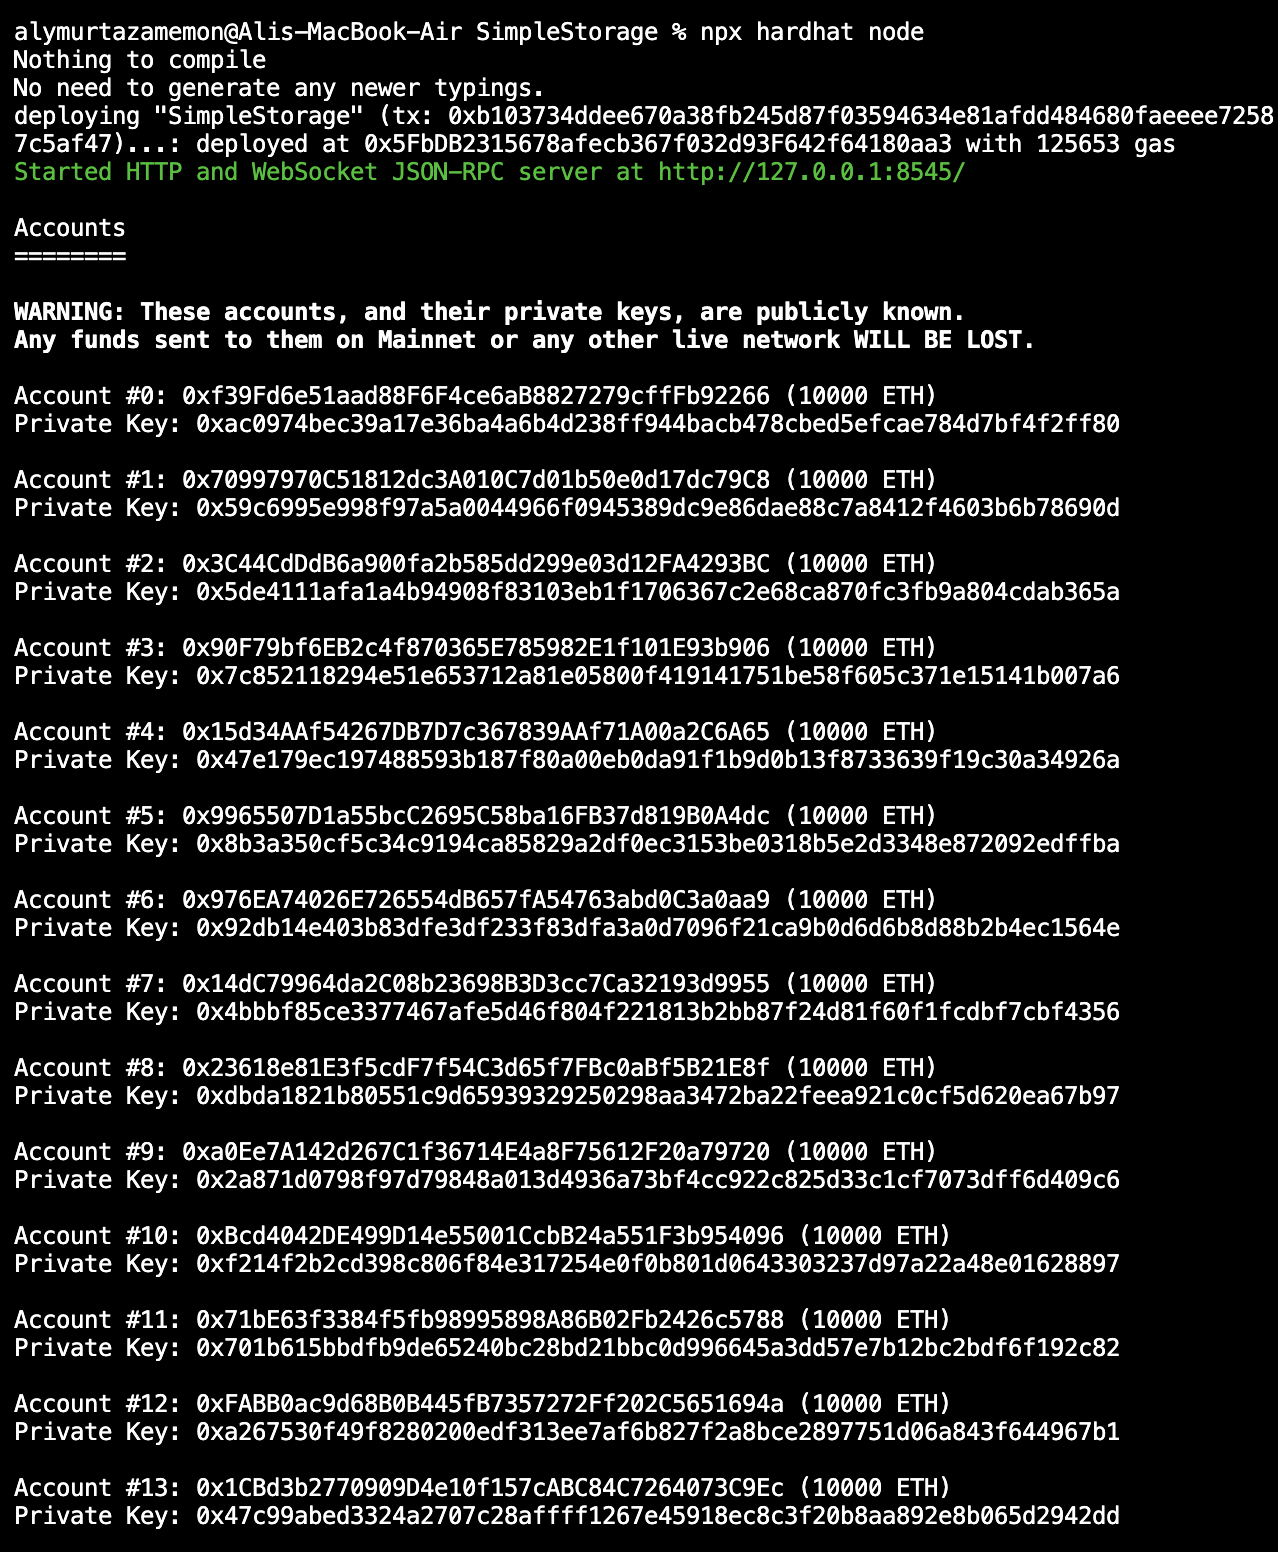
With the Hardhat Deploy plugin, the need to run individual deployment scripts for each smart contract on the Hardhat node is eliminated. The plugin automatically deploys all smart contracts when the Hardhat node is opened, as demonstrated in the example provided.
With this setup in place, there is no need to redeploy your smart contract each time it is used in other scripts. By including the following line of code, the instance of the previously deployed contract can be accessed and utilized.
const { deployer } = await getNamedAccounts();
const simpleStorage = await ethers.getContract("SimpleStorage", deployer);

// now you can call your smart contract public function and variable with just this instance.
What if we only want to deploy selective deploy scripts from the deploy folder?
Do you remember this line we added at the end of our 01-simple-storage.js file?
module.exports.tags = ["all", "simpleStorage"];
In scenarios where only a specific set of smart contracts from the ‘deploy’ folder are intended to be deployed, the Hardhat Deploy plugin offers the capability to selectively deploy those contracts by providing their tags names as arguments to the command npx hardhat deploy --tags <tag-name>, this allows for a more efficient deployment process by enabling the selective deployment of only the necessary smart contracts.

Use Deployed Smart Contracts in Tests
An additional benefit of using the Hardhat Deploy plugin is the ability to ensure the deployment scripts are executed in tests as well.
By calling await deployments.fixture(['MyContract']) in your test, the same deployment is used for all tests, which eliminates the need to replicate the deployment procedure.
To deploy all smart contracts before running tests, an ‘all’ tag feature can be added to all deployment scripts, and this await deployments.fixture(['all']) can be added to the test file. This enables the deployment of all contracts before the tests are executed, ensuring that the test environment accurately reflects the deployed state of the smart contracts.
The 'tag' feature, as well as dependencies, also simplify the process of writing complex deployment procedures. The plugin also allows for the organization of the deploy scripts into sub-folders and execution in a logical order.
Conclusion
Overall, Hardhat Deploy is a powerful and versatile tool that can greatly simplify and streamline the deployment process for smart contracts. It is widely used by developers and organizations in the Ethereum community and can be a great addition to your development workflow.
This comprehensive guide aims to provide assistance to developers of all skill levels and is intended to be beneficial for a wide range of developers. Despite its length, the information provided is intended to be easily understandable and actionable for all readers.
If you found this content helpful, please consider giving it a clap and leaving any feedback for future improvements. Your suggestions and comments are greatly appreciated and will help make these articles even more valuable for you and other readers.
Be sure to follow me to receive updates on my future articles and stay informed of new content.
Thank you


